In this scenario you will learn how to build an organization with different permission levels for each department with specific function modules.
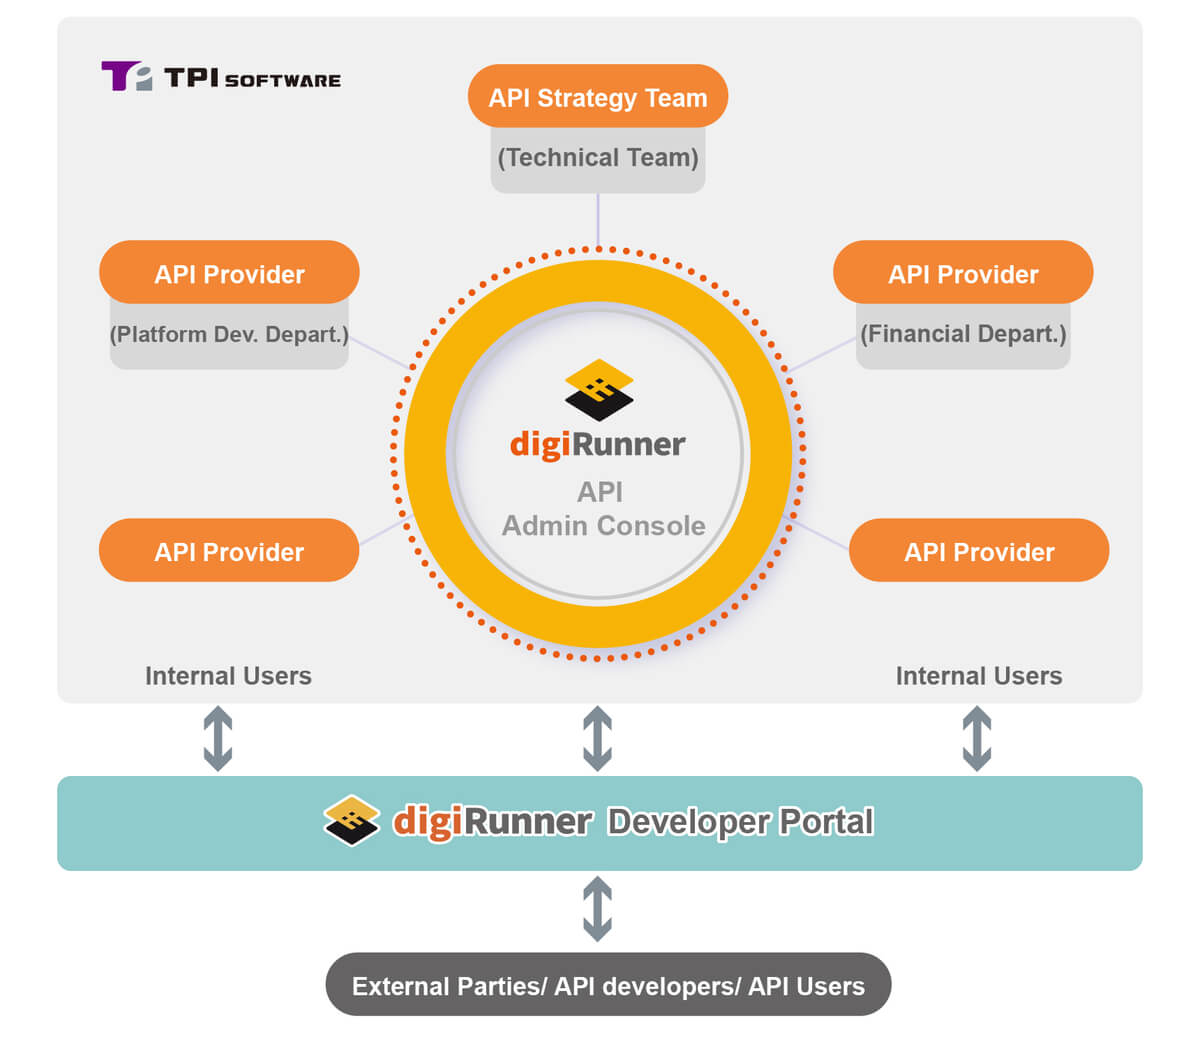
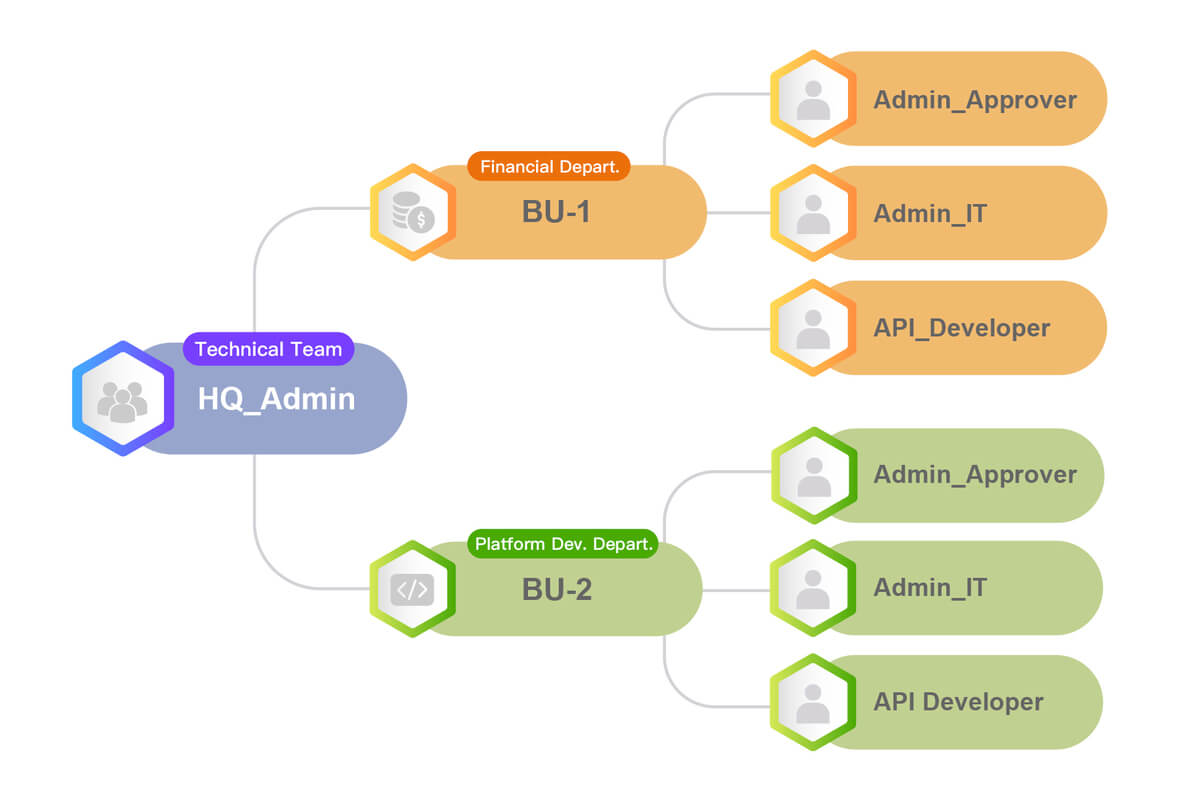
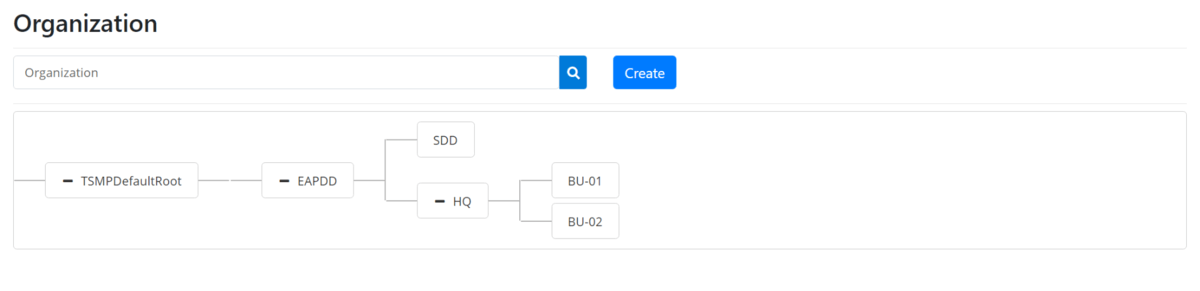
Anny as “HQ_Admin” with the highest permission level for the platform, is going to start with the setup of platform hierarchy relations based on Financial Department’s (BU-1) needs, and grant role permissions also users (e.g. Admin_Approver) to access different digiRunner platform functions modules.
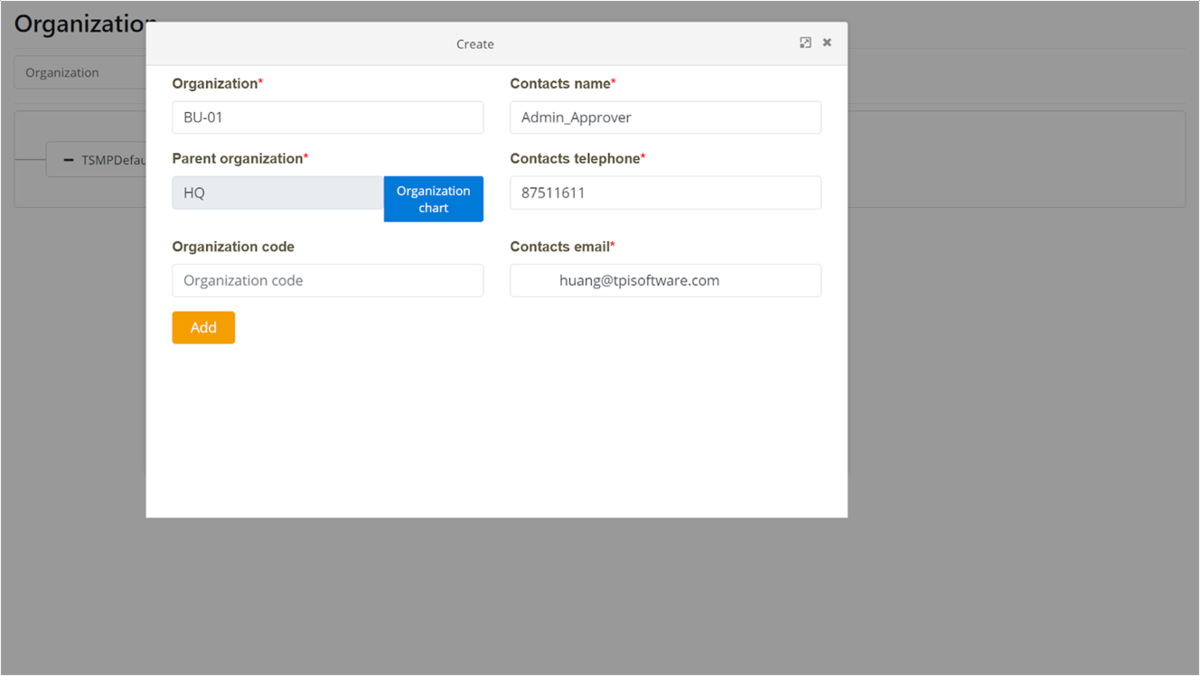
Enter your organization information (BU-01, Admin_Approver), then click “Add” to create the new organization nodes on the chart.
Click the “User Management” of the left function module bar.
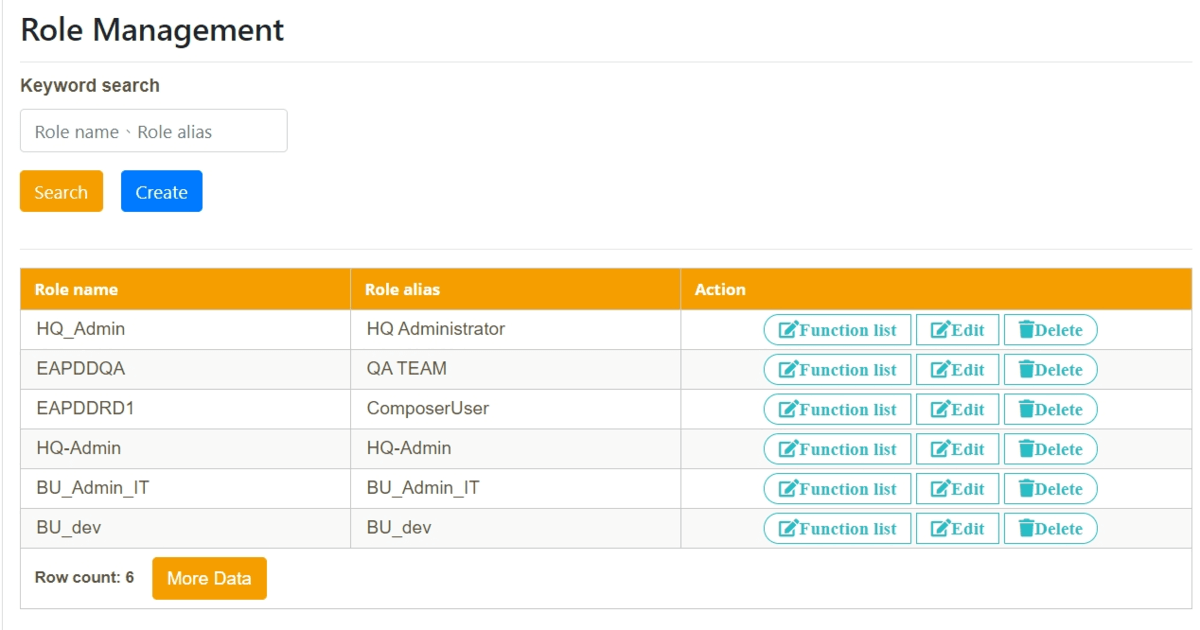
Go to “Role Management” to create the Role (BU_Admin_Approver).
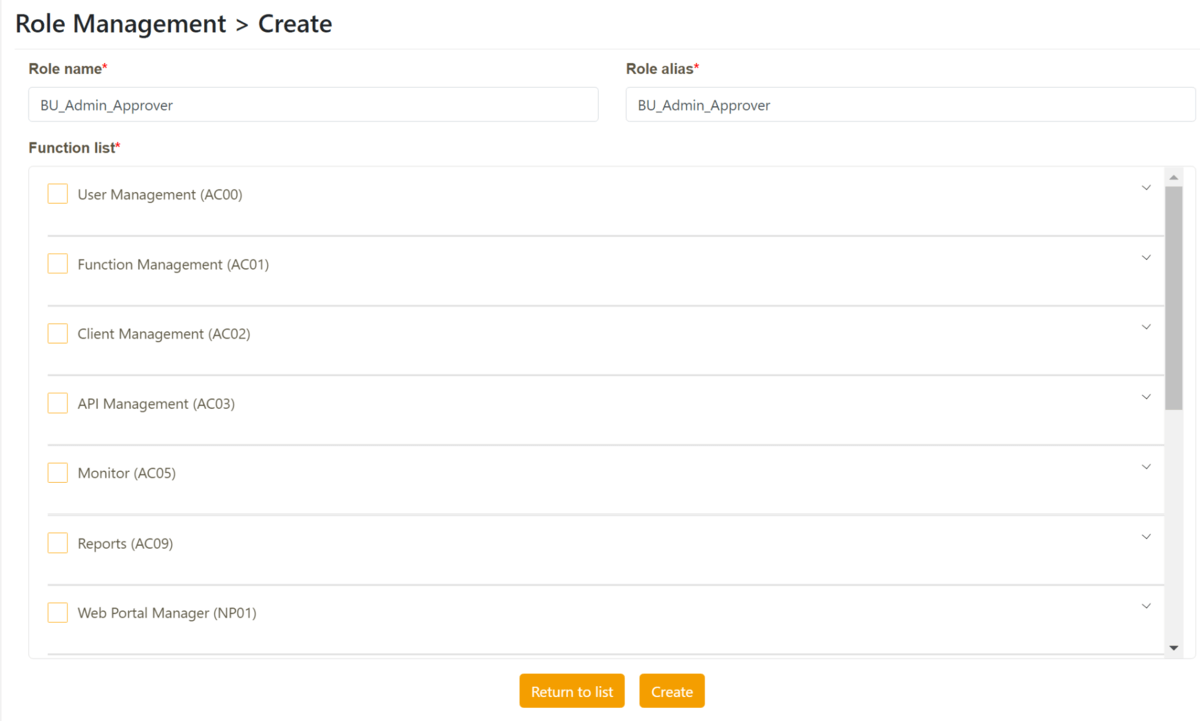
Enter the Role Name and Role Alias(BU_Admin_Approver), then check the functions from the “Function list” that the Role is allowed to access. Click “Create” to create the role.
Click the “User Management” of the left function module bar.
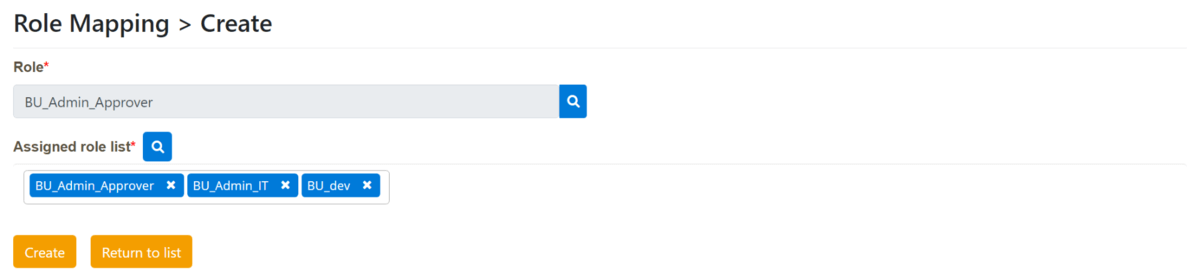
Go to “Role Mapping” to create and grant the role list to Role “BU_Admin_Approver”. Assign the role list (BU_Admin_Approver, BU_Admin_IT, BU_dev) to BU_Admin_Approver.
Click the “User Management” of the left function module bar.
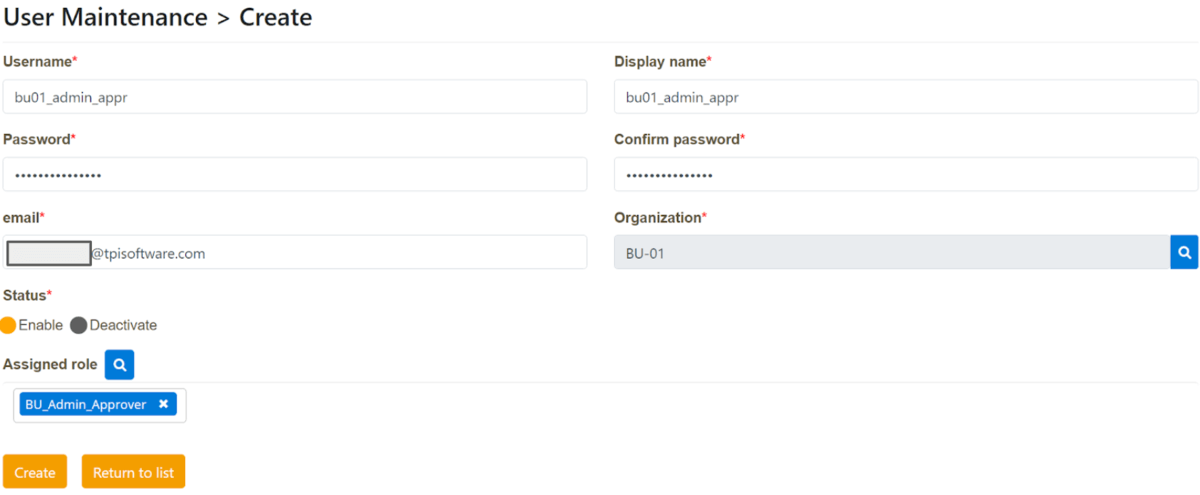
Go to “User Maintenance” to create a user under BU-01 organization and grant the role “BU_Admin_Approver” to access the specific functions.
In this scenario you will learn how to register your API to digiRunner from different AP servers, and enable the delegation of API proxy with digiRunner.
The Financial Department has dozens of APIs from different servers (AP, DB, FTP, etc) and would like to manage them in one platform. With digiRunner API Proxy (API Register) service, the team can easily register APIs to digiRunner via API url (http / https), or can register the APIs via Swagger document to digiRunner and delegate digiRunner to handle the proxy and management works. The “currencyRate” API is one of the target APIs registered to digiRunner.
Click the “API Management” of the left function module bar.
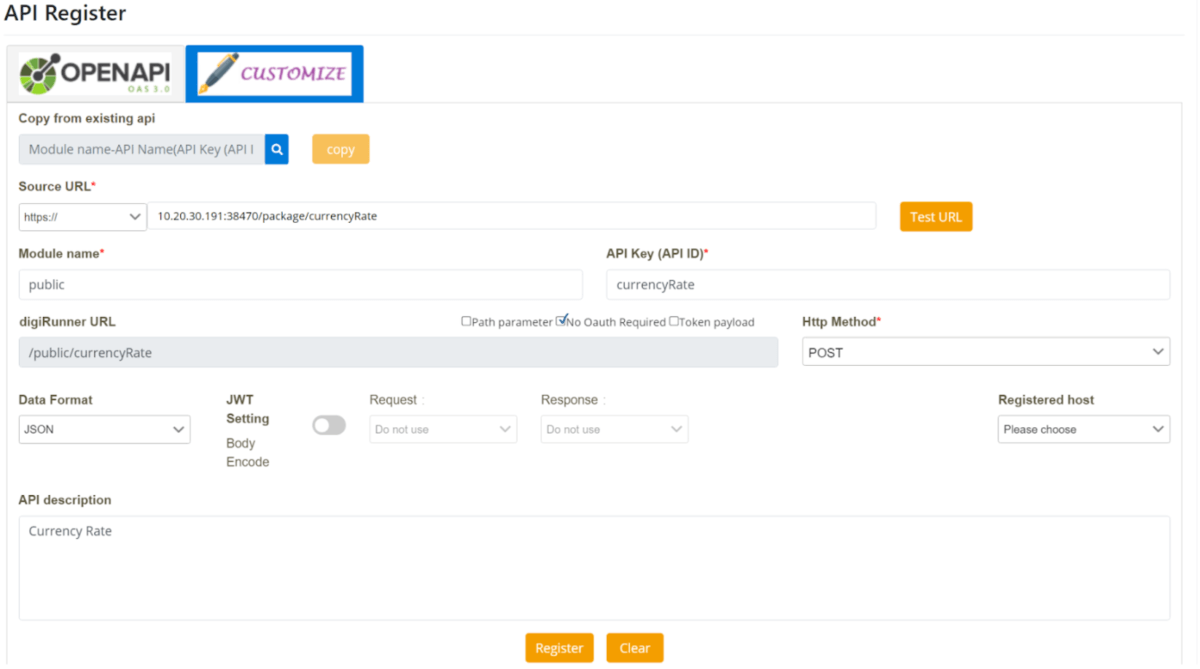
Go to “API Register” to register the target API – currencyRate
Click “Customize” and enter the required information (Source URL, Module Name, APIKey (API ID) and Http Method).
Since the CurrencyRate provides public information and no authorization is needed, check the “No Oauth Required” column.
Click “Register” to finish the process.
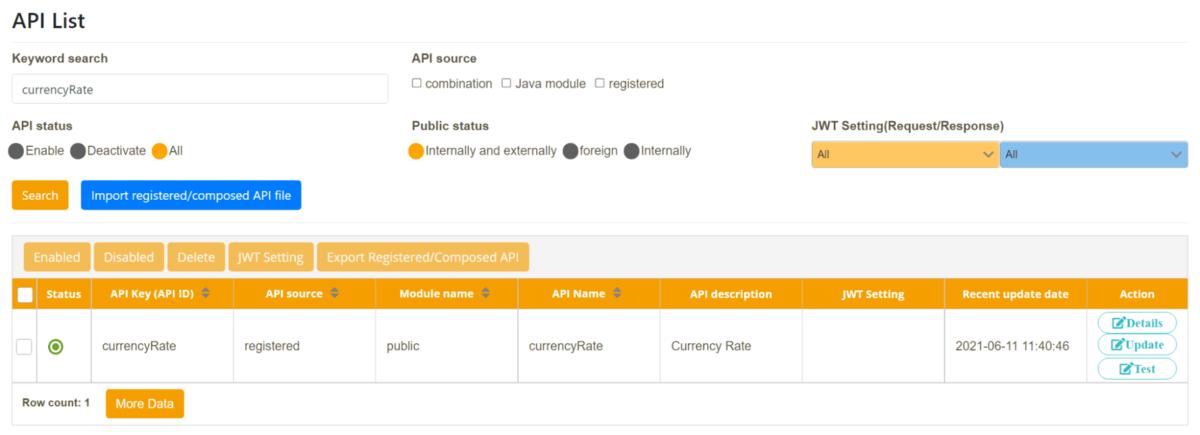
Now you can find the “currencyRate API” at “API List”.
Click “Enable” to enable the selected API (Status light shows in green after successfully enabled).
In this scenario you will learn how to add JWE/JWS encryption to the API via digiRunner Admin Console without additional coding efforts.
For information security purposes, TPIsoftware has announced that all classified information transferred within or outside the organization should be encrypted, which includes APIs.
In compliance with the regulation, digiRunner provides codeless API encryption function, and platform users like Anny or any who with API edit permission can add the JWE/JWS to their own APIs through digiRunner Admin Console. Besides, the API list allows users to see if JWE/JWS encryption has been applied to the APIs or not. Here we take “fileTransform” API as example:
Click the “API Management” of the left function module bar.
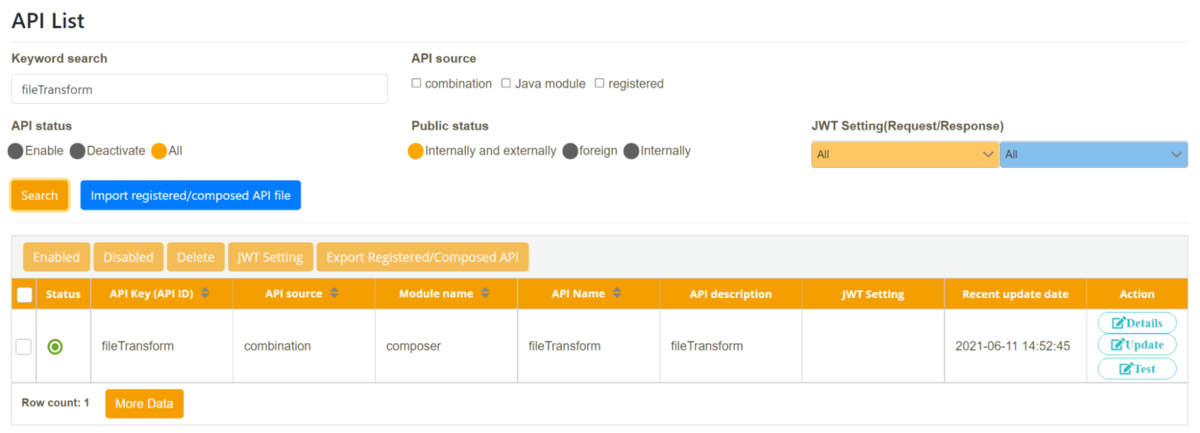
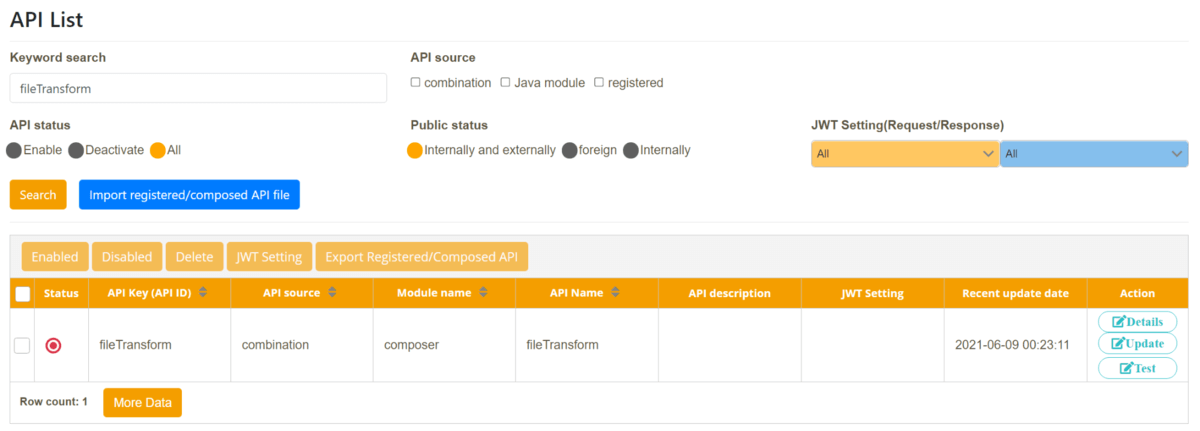
Go to “API List” to search the target API (fileTransform API)
Click “Update” at the “Action” area (at the end of the column) to update the API settings.
Open the “JWT Setting” button and select the request/ response encryption way then click “Update” to save the setting.
Updated JWT setting will show in the “API List” API information area.
In this scenario you’ll be able to know how to easily enable or disable APIs via digiRunner Admin Console.
Anny and her team just finished the annual API resource inventory, and they found the APIs need to be disabled due to security concerns and some of them are no longer needed. The “backendConnection” API is one of the APIs that should be retired.
With digiRunner Admin Console, Anny can easily manage the APIs just by a few simple clicks.
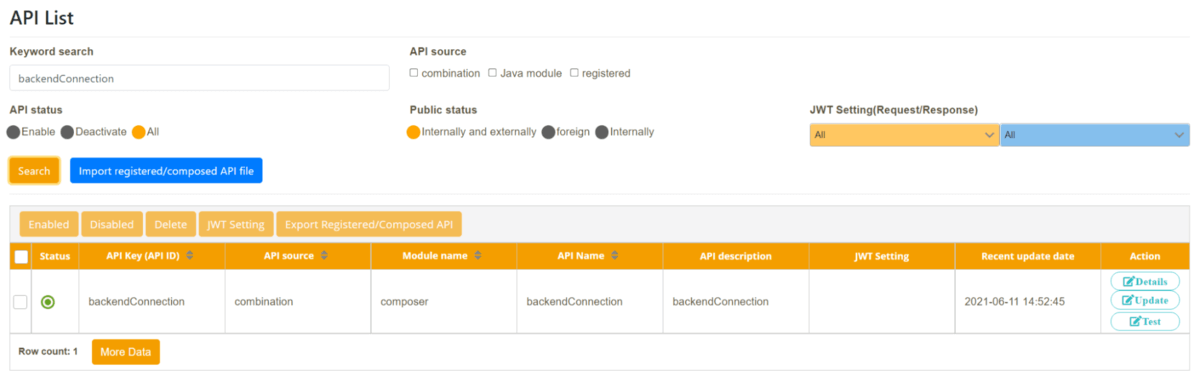
Click the “API Management” of the left function module bar.
Go to “API List” to search the target API (backendConnection API)
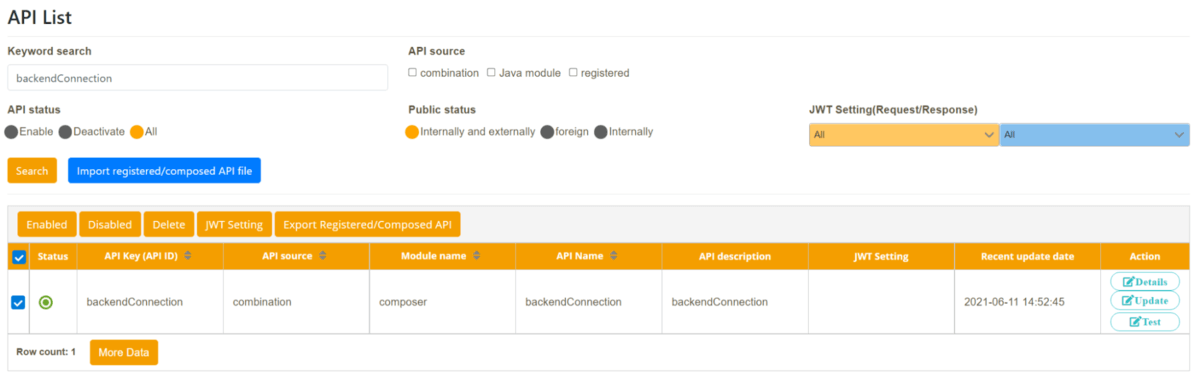
Select the target API and click the “Disable” button.
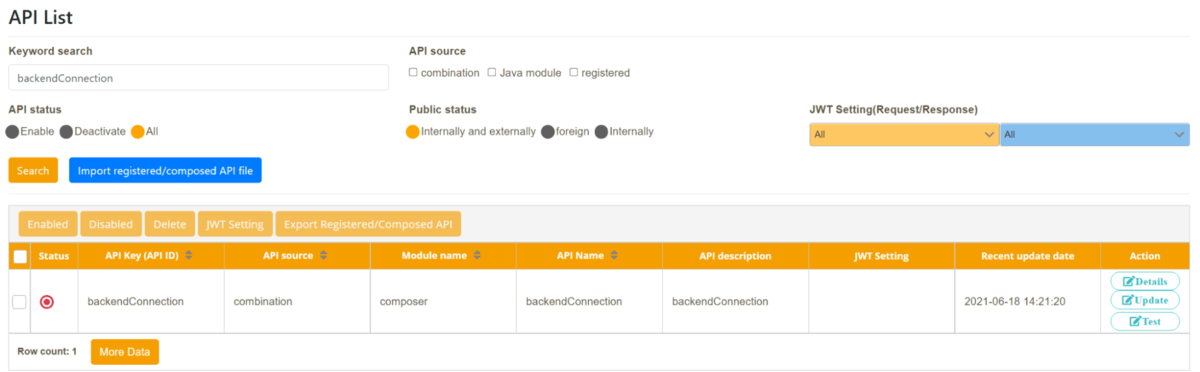
The disabled API can still be searched on the API list, just the status light will be indicated in red.
Anny and her team review the APIs in digiRunner, group them by security level and attributes. So when a new client has been created, the admin can easily authorize APIs by group instead of one by one.
Following the API security policy, all the APIs contributed from TPIsoftware members and certified partners are defined as “System Security” level. For easier authorization, API attributes are also one of the grouping rules. “Composer” group is one of the groups in the organization.
Click the “Client Management” of the left function module bar.
Go to “API Group Management” and click the “Create Group” button to create a new group.
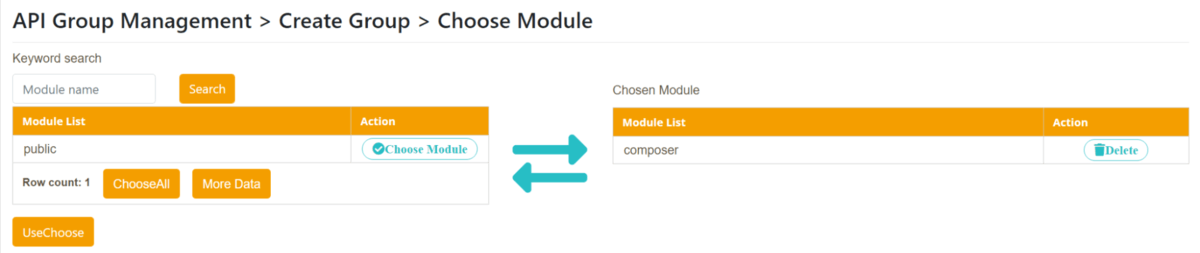
Provide detailed setting information of the group, and then click “Choose Module” to select the specific module to assign to the group.
Click “UseChoose” to apply the setting.
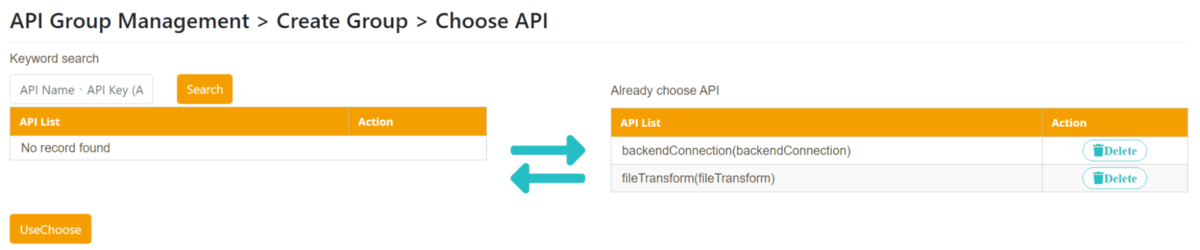
Click “Choose API” to select the APIs. For the “Composer” Group, the “fileTransform” and “backendConnection” API should be assigned to the group.
Click “UseChoose” to apply the setting.
Check if all the settings have been applied, and click “Create” to finish the Group creation process.
Click the “Client Management” of the left function module bar.
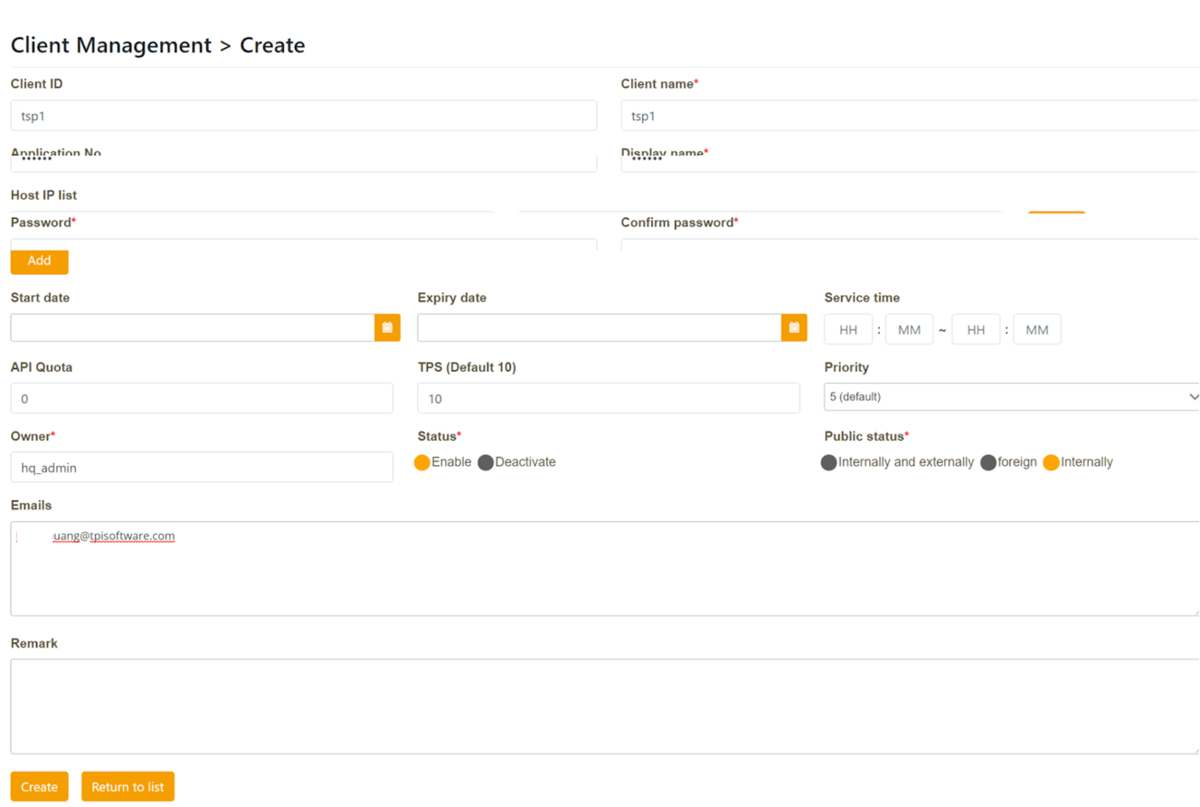
Go to “Client Management” click “Create” to create the new client.
Enter the setting information (ID, name, display name, password, owner, status and public status) of the client (Client ID: tsp1), then click the “Create” button at the bottom of creation form.
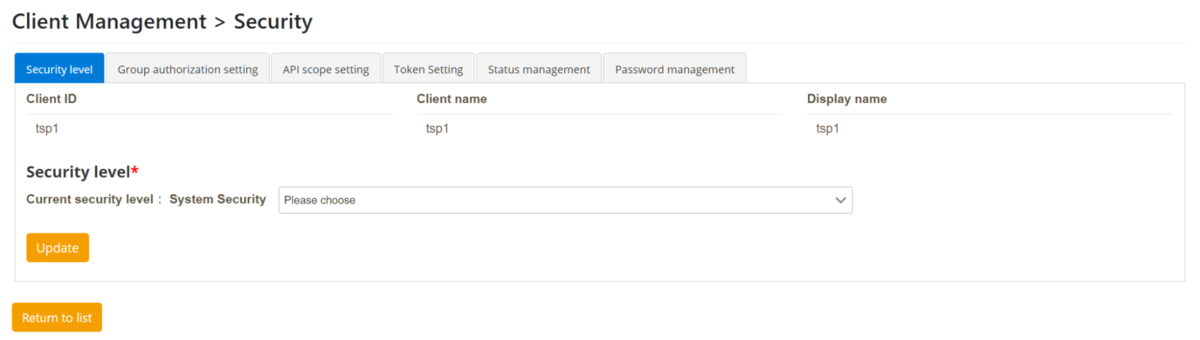
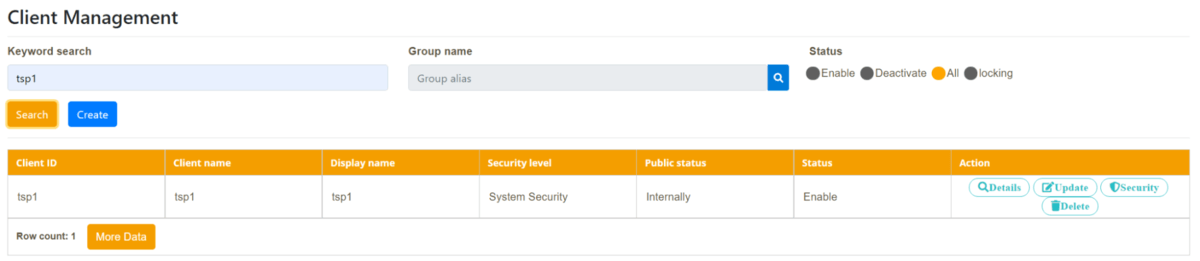
Search client “tsp1” at the “Client Management” search bar, then click “Security” at the Action column to set the security information.
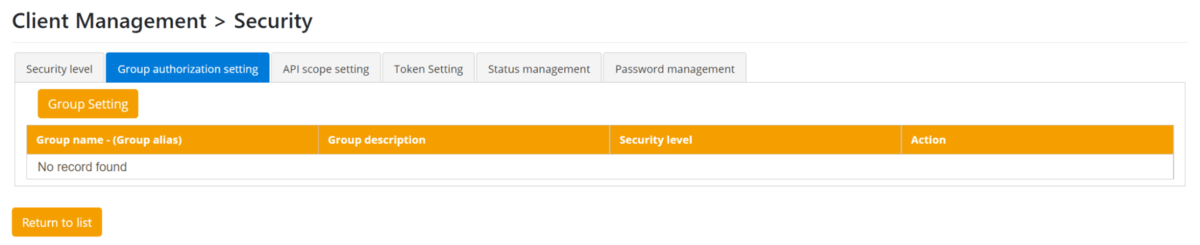
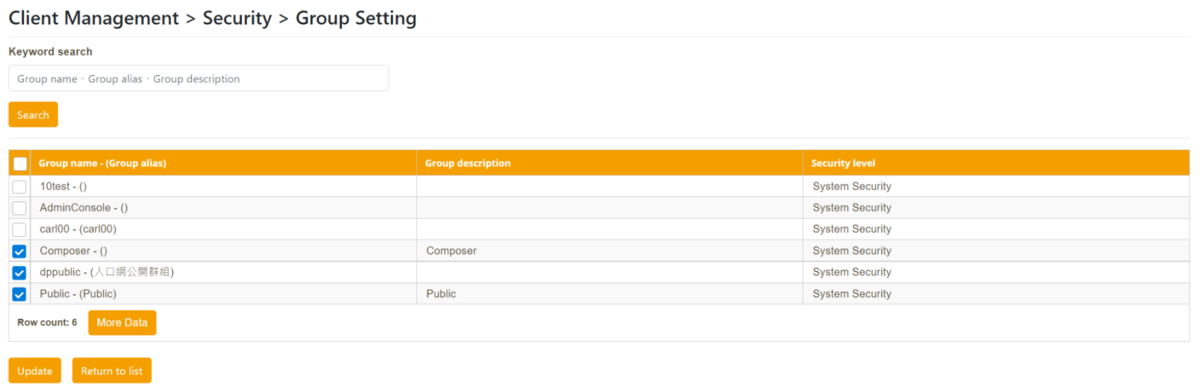
Click the “Group authorization setting” tab and then click “Group Setting” at the “Security” to update the authorized group.
Assign group “Composer”, “dppublic” and “Public” groups to the client, then click “Update” to update the setting.
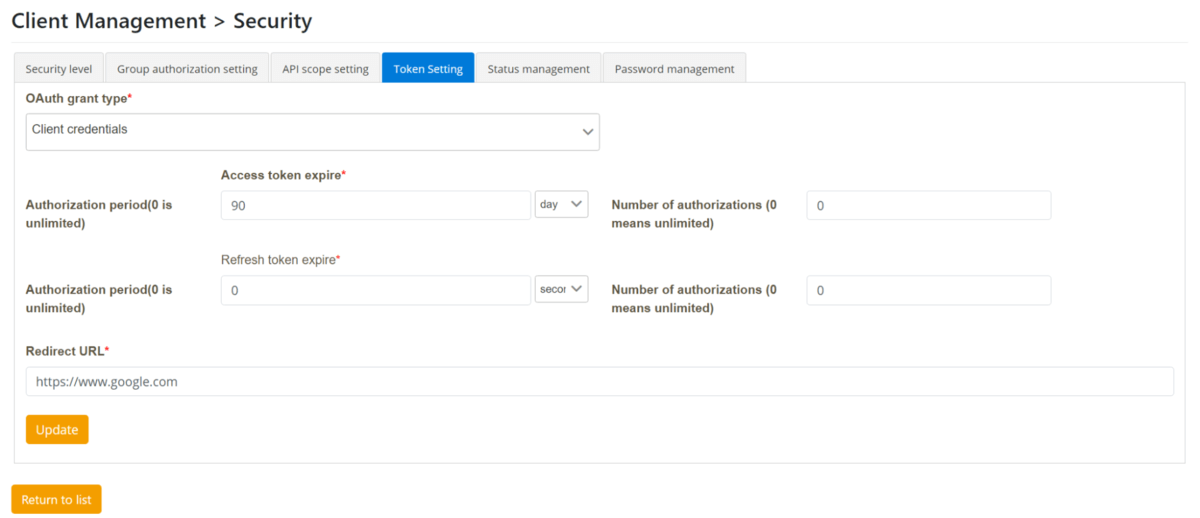
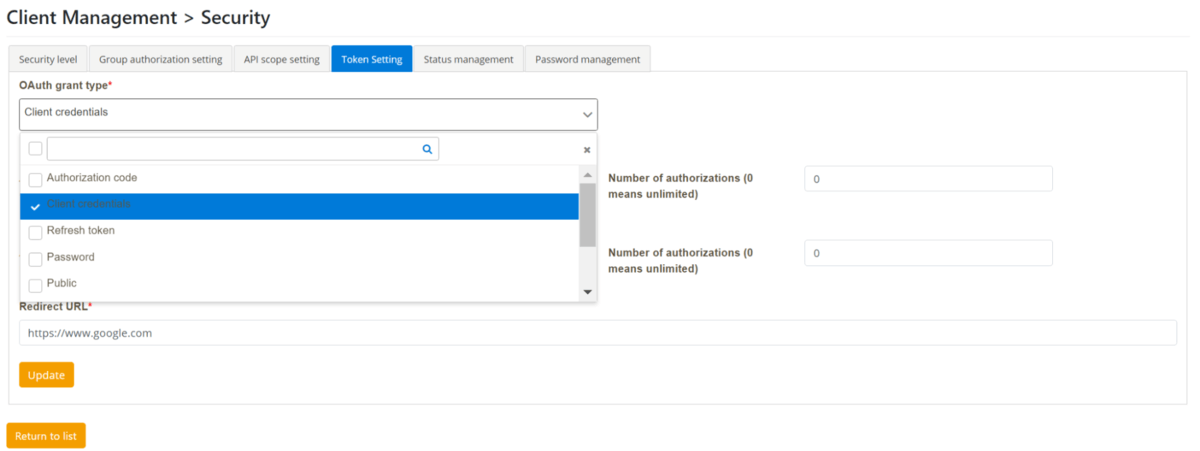
Click the “Token Setting” tab in “Security”, update “OAuth grant type”, “Access token expire” and “Refresh token expire”information.
Click “Update” to save the change and then click “Return to List” to finish the process.
(Available at digiRunner Enterprise)
Managing APIs from different parties and servers is not easy, since there might be different formats of APIs. But for TPIsoftware is not a big thing. Anny has one API in XML format, by simply registering the API to digiRunner and using digiRunner API Composer, the format can be quickly converted from XML to Json.
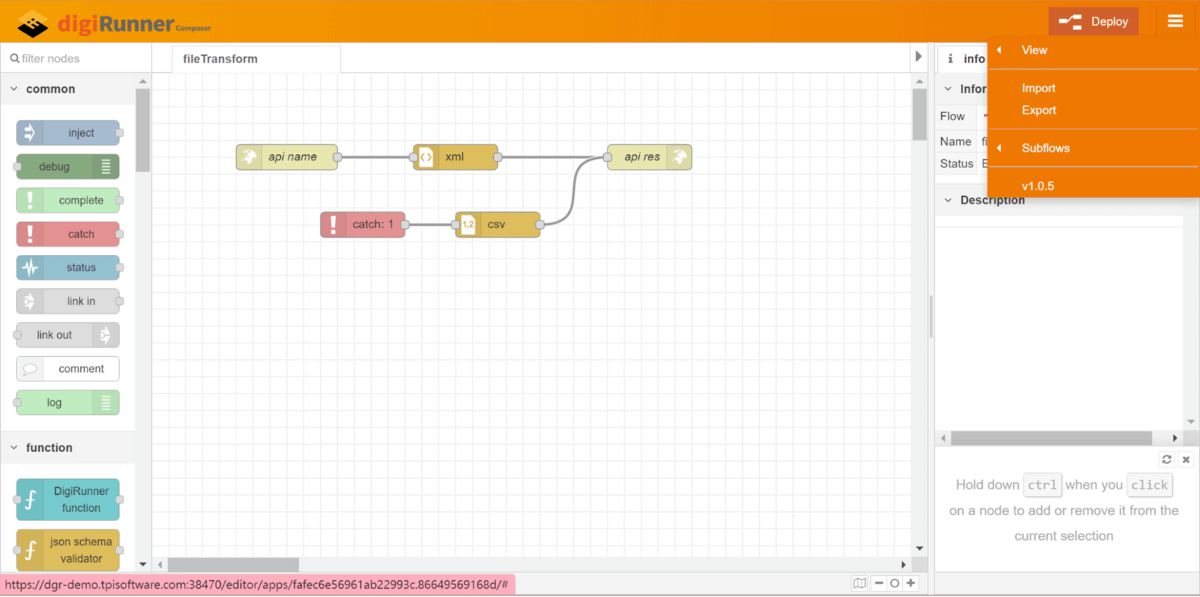
Click “Open Composer” to enter “digiRunner Composer”.
Click the “Export” drop-down menu at the upper right corner to export the API to .Json.
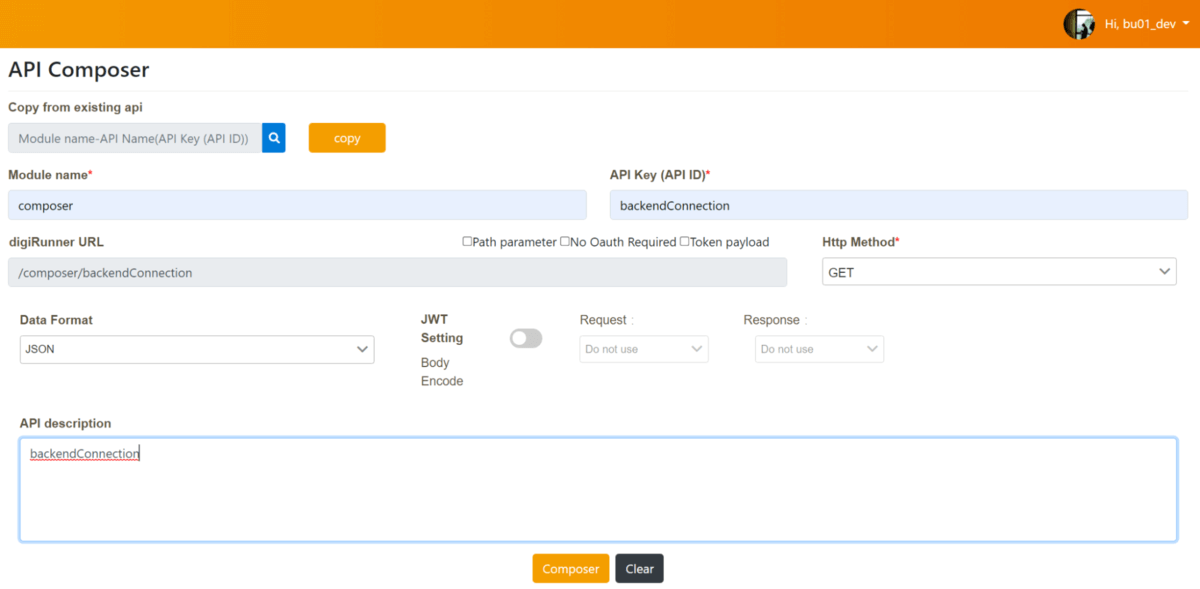
Go to “API Composer” under “API List” of the left function module bar.
Enter the required information and then click “Composer” to go to digiRunner Composer.
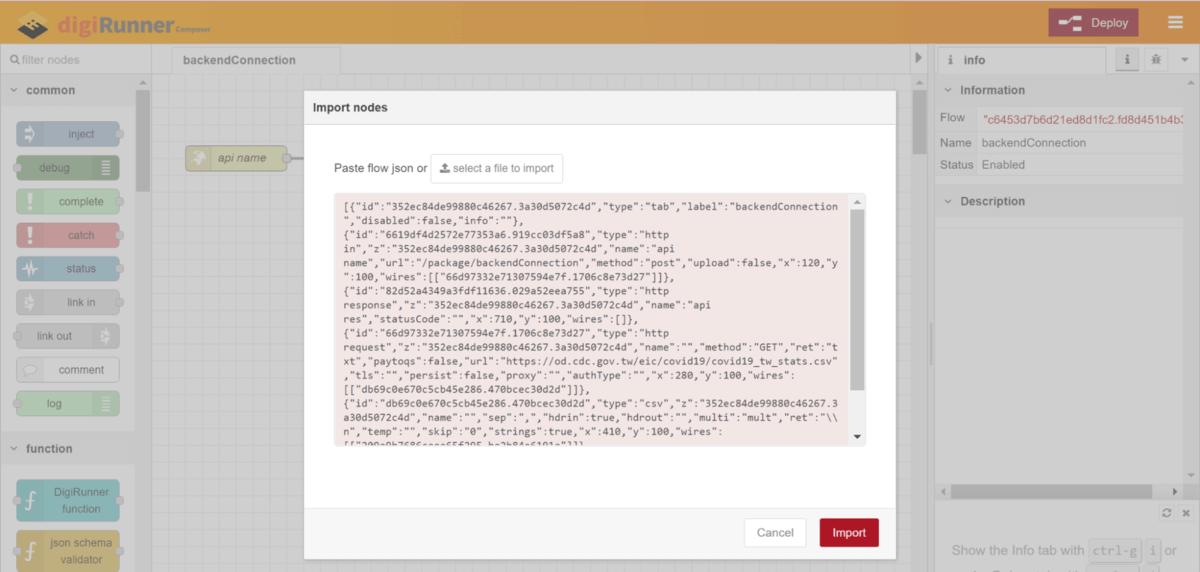
Click “Import” to import the .Json file.
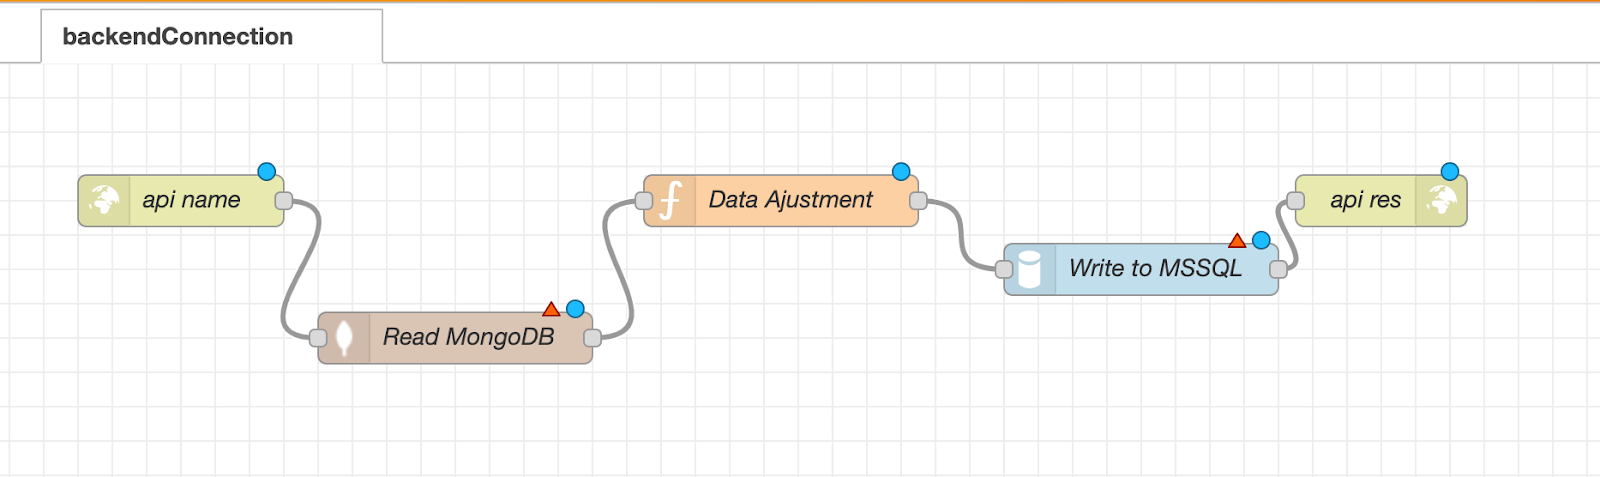
Then edit Node to customize the API function.
After editing, click the “Deploy” button for deployment.
(Available at digiRunner Enterprise)
In this scenario you will learn how digiRunner low-code API Composer that provides diverse function nodes allows you to make an API connected to your backend system such as MQ and SAP RFC simply with drag-and-drop action for the function nodes.
TPIsoftware positions digiRunner as an API resourcing hub of the company and connects it to its several backend systems. However, usually it takes some time to develop an API to do the connection effort to the backend system. Not to mention there’re lots of systems that need to be connected. This is why the API composer has been created: To ease the coding burden.
The infra engineer of Platform Development Department simply uses digiRunner API composer with powerful low-code features to design a new API by dragging and dropping the function nodes within 5 mins.
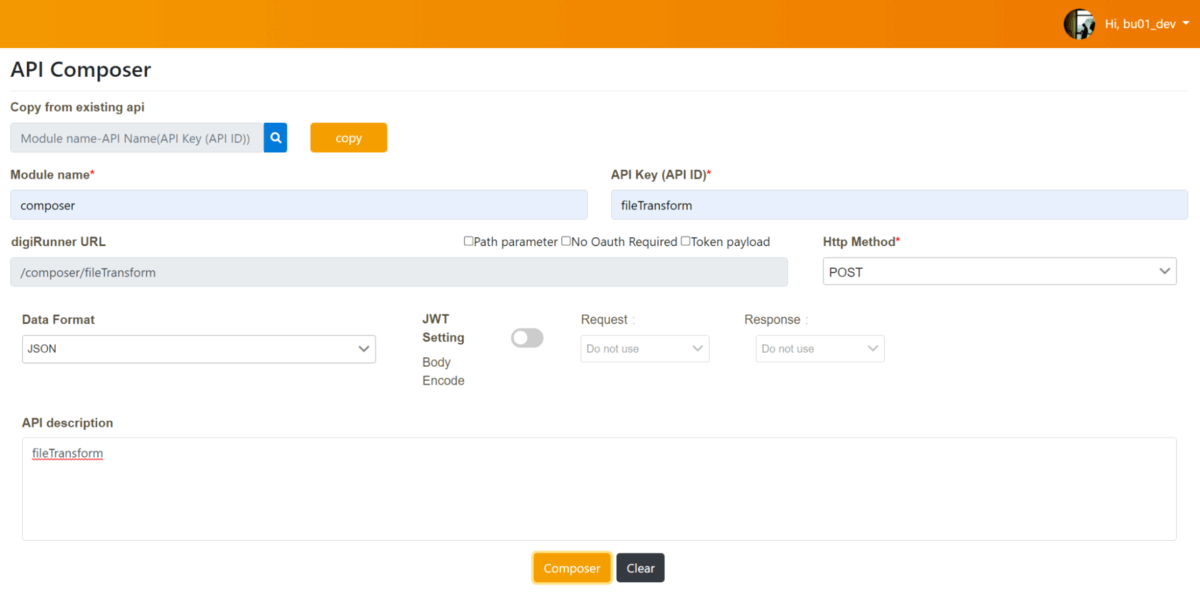
Go to “API List” under “API Composer” of the left function module bar.
Enter the required information then click “Composer” to go to digiRunner Composer.
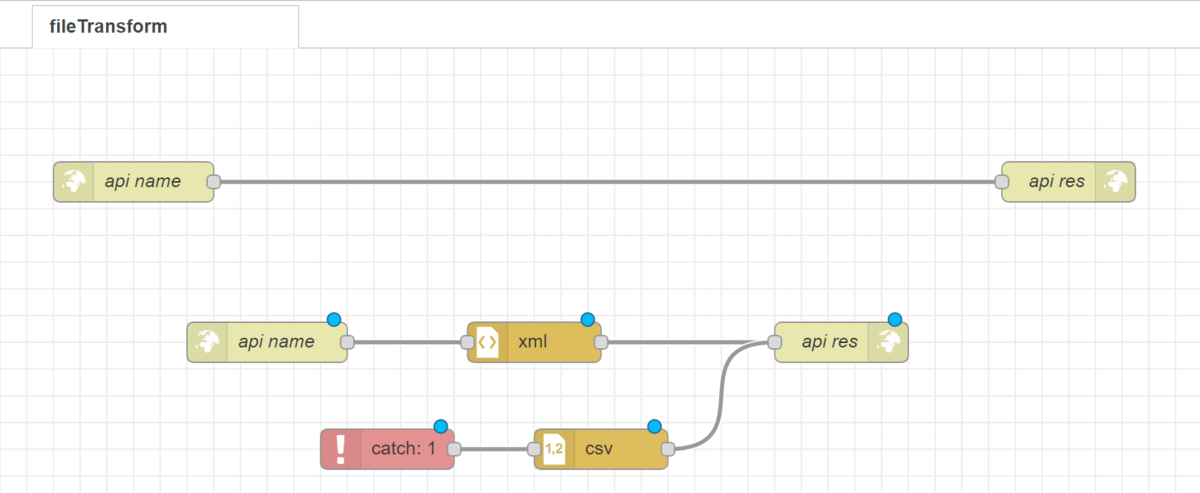
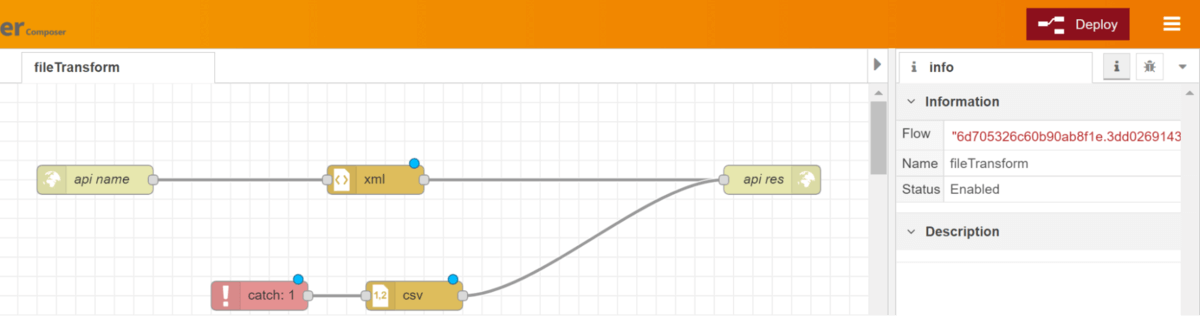
Edit Nodes to customize the API function.
After editing, click the “Deploy” button to deploy.
In this scenario you will learn how to use digiRunner Admin Console to set your APIs’ authorization. digiRunner provides the following authorization methods:
Public, API Key, OAuth 2.0 (Client Credential/ Password/ Auth Code/ Implicit).
Andy is one of the 3rd party developers to reach API resources through digiRunner Developer Portal (External entrance to reach API applications) outside of TPIsoftware organization.
His API authorization method has been set with OAuth:Client Credential. To make sure he can only successfully get specific API responses from the API designed for being open to the public rather than internal development purposes inside of TPIsoftware.
Go to “Client Management” under “Client Management” of the left function module bar.
Search the target client(tsp1).
Click “Security” at the Action column to set the security information.
Click the “Token Setting” bookmark.
Set the authentication type(client credential) at “OAuth grant Type”
Click “update” to save the changes.
In this scenario, you will learn how to simply validate if your API proxy or API URL works via digiRunner Admin Console.
The Financial Department IT would like to check if the “currencyRate” API still works. He finished the API test task with simple clicks through digiRunner Admin Console.
Click the “API Management” of the left function module bar.
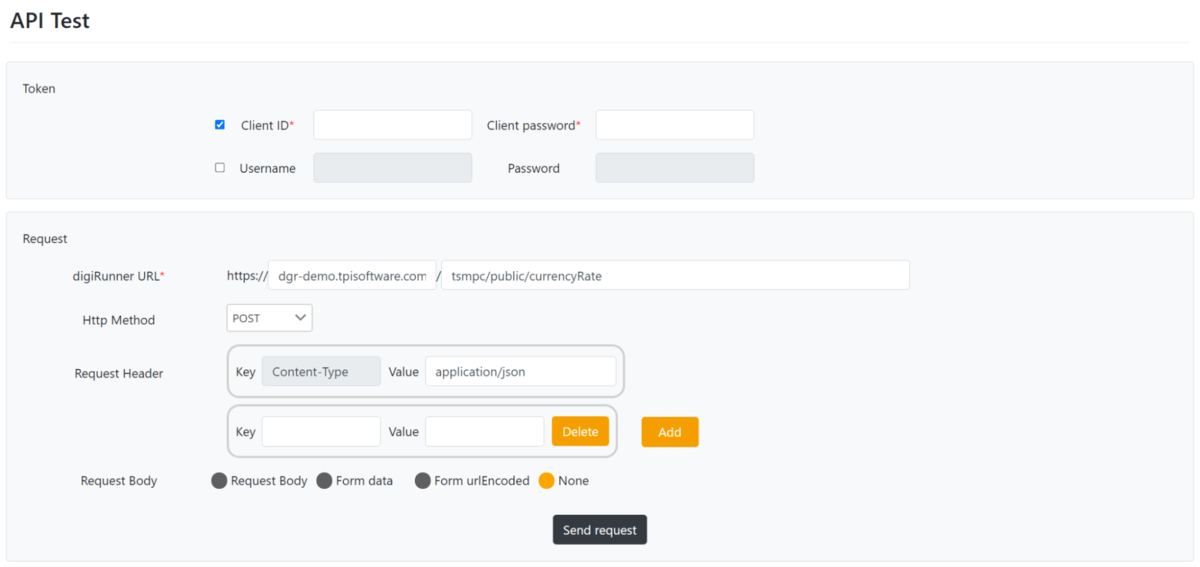
Go to “API Test” to test the target API (currencyRate API)
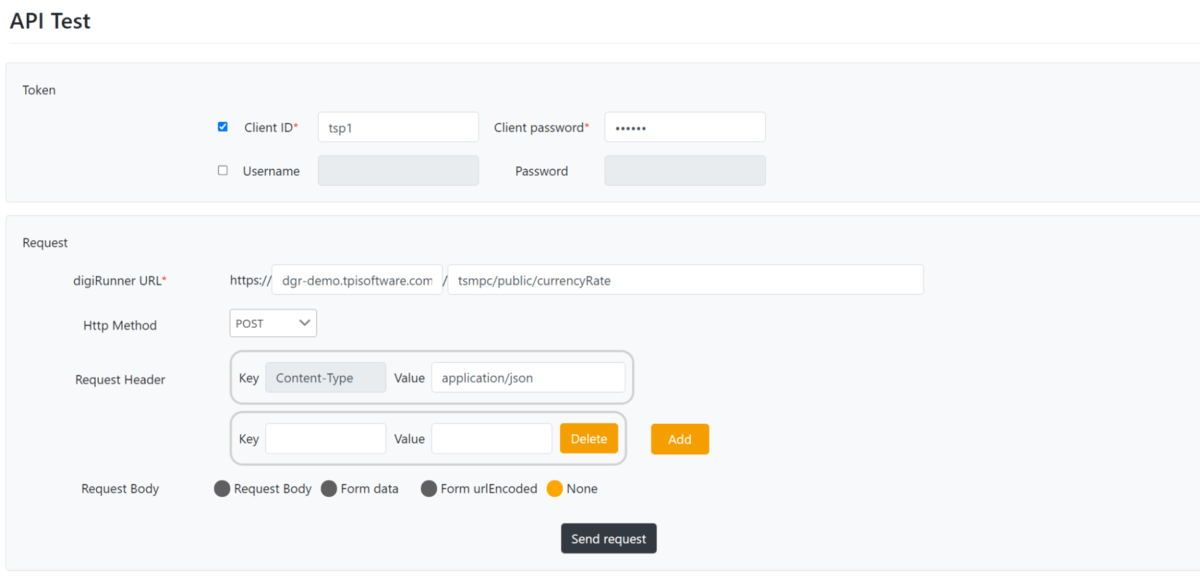
Enter Token information and provide target digiRunner URL, Http method, Request Header and Request Body.
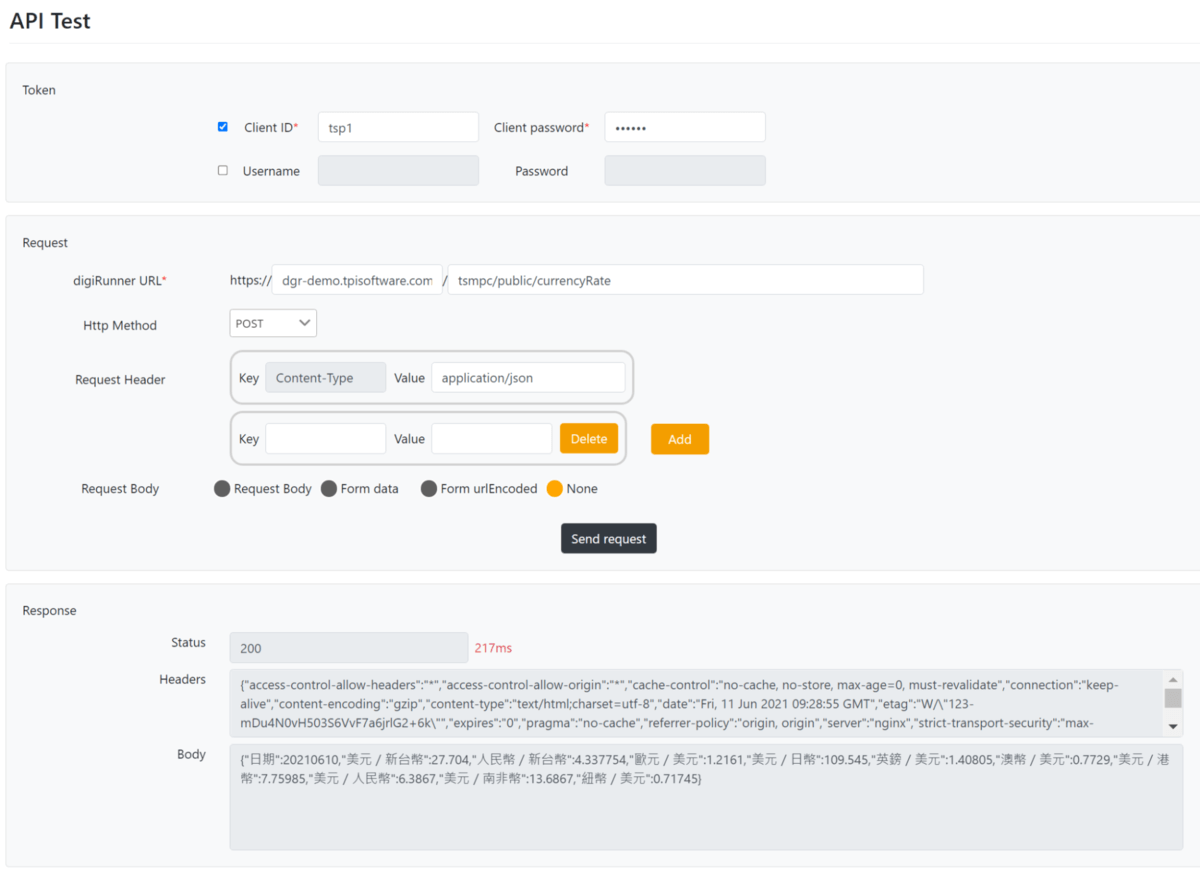
Click “Send request” to see if you get response successfully .
digiRunner also features API Statistic Reports for organizations such as the report on which API is the most popular and which client calls the API most frequently. Platform users can be provided with data insight to enhance the operation efficiency and API strategy optimization.
(digiRunner provides reports such as the following API Usage, API Call, Traffic and Time Analysis, Bad Attempt Connection, Client Usage, Client – API Usage, API Integrity Analysis, etc.)
User related data is definitely one of the most important parts to analyze the user behavior for operation strategy development. The Financial Department would like to know which API is the most popular one for their clients, and to see what they can do to improve their Fincience API design plan.
Click the “Report” of the left function module bar.
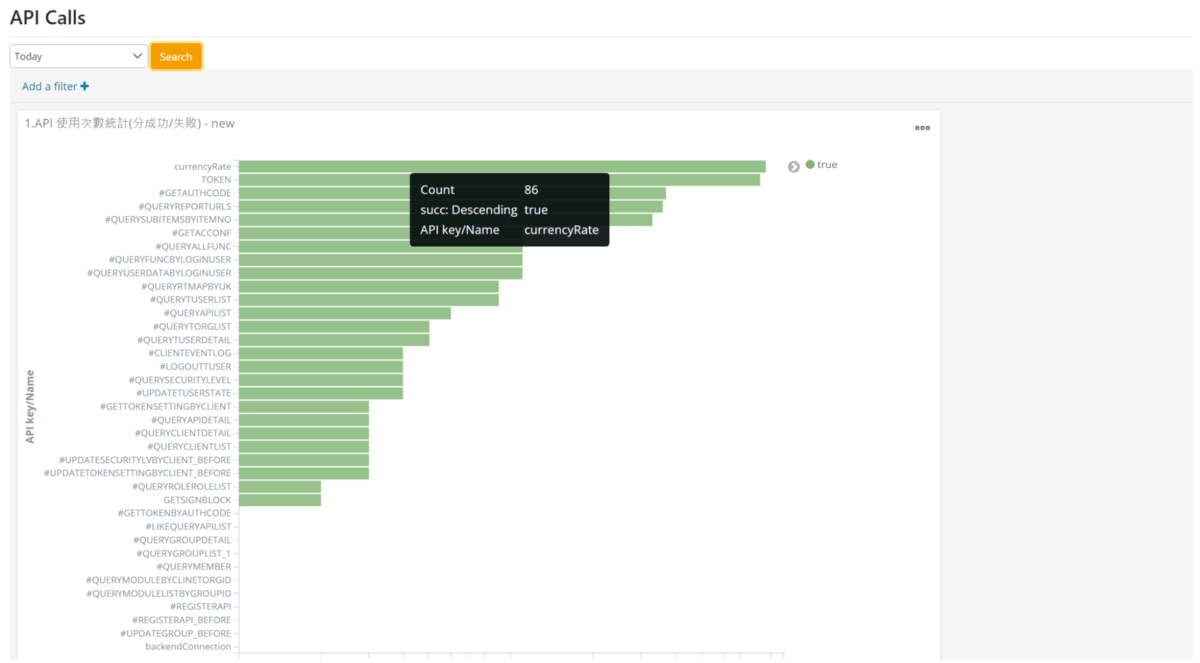
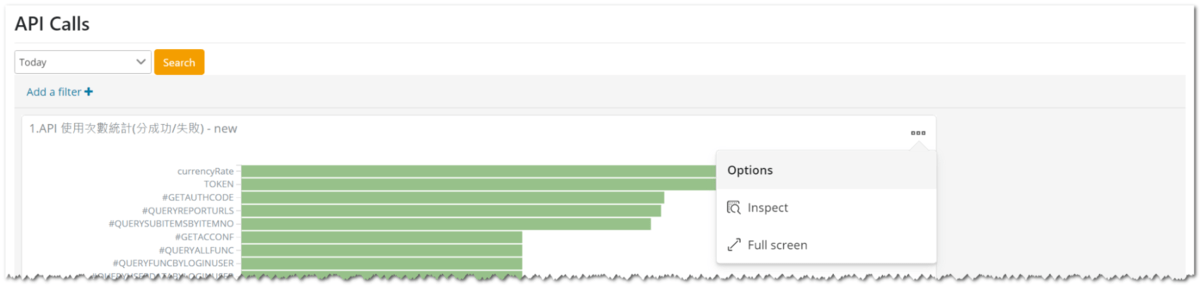
Go to “API Call” to see the call trend.
Select the time period and add a filter if needed.
Mouse over the green bar to see further information and numbers.
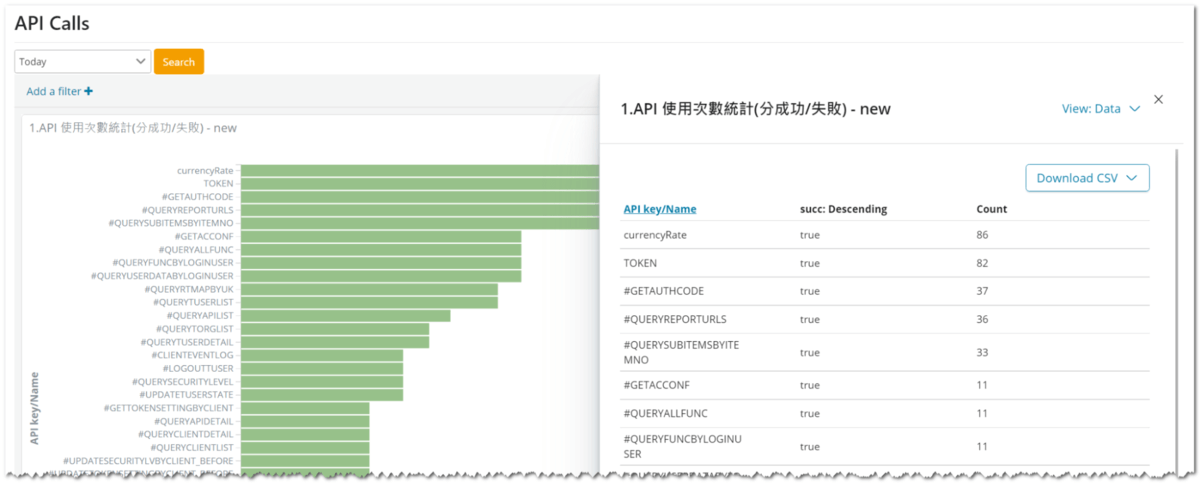
Click the 3 dots icon at the upper right corner and select “Inspect” to see the detailed data.
Download CSV if needed.
(Available at digiRunner Enterprise)
In this scenario you will learn how to easily search API logs through API reports in digiRunner Admin Console.
(digiRunner provides reports like: API Usage, API Call, Traffic and Time Analysis, Bad Attempt Connection, Client Usage, Client – API Usage, API Integrity Analysis…etc).
The IT staff of Financial Department received the user feedback suggesting “currencyRate” API transaction error these days. To solve the problem, examining the API log is the first step. By searching “currencyRate” API logs through API reports in digiRunner Admin Console, the IT staff easily finds out the problem from the log data.
Click the “Report” of the left function module bar.
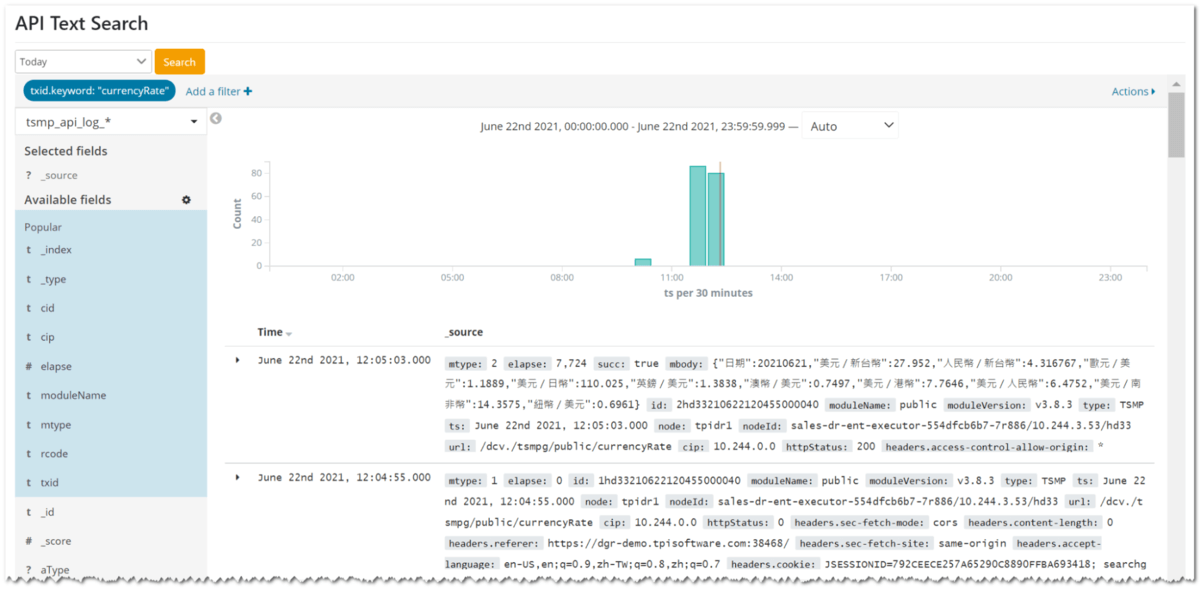
Go to “API Search” to view the API Logs.
Select the time period.
Add filter of “currencyRate” API to specify the search range and click “Search” to see the API logs.
In this scenario you’ll be able to understand digiRunner’s feature of security: WAF protection, traffic control and IP bound.
For adherence to the security policy, all contributors leveraging digiRunner APIM platform within TPIsoftwars can only access the platform through specific IP (111.111.10.100). Through Client Management in Admin Console, the platform manager can easily manage the traffic control and IP bound.
Go to “Client Management” under “Client Management” of the left function module bar.
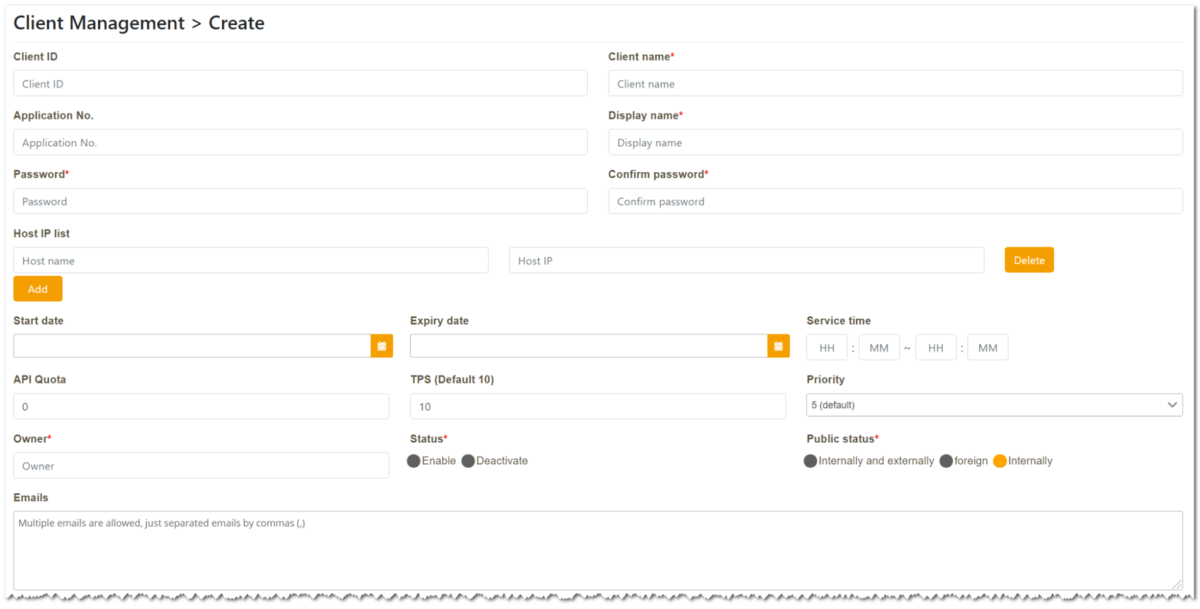
Click “Create” to start the process.
Insert the IP: 111.111.10.100 at the “Host IP list” column and provide Host Name.
Configure the API traffic setting through providing specific range to “API Quota” and “TPS”.
(API Quota = 0 means there’s no API call limitation of this client.)
(Available at digiRunner Enterprise)
In this scenario you will learn how to publish your APIs to API Developer Portal for internal and external parties. Configure the publication status (Internal/External) so your partners (API Clients) can search the APIs they need and request for authorization through one entrance.
The Financial Department found out that the ”Currency Rate” API is the most popular API among current clients. They plan to enable the API to be searched on API Developer Portal for easier search/ access to internal and external parties.
Different members are assigned with different platform permission levels under the organization design. Following the permission design, the Finance Department customizes the workflow to control the process of creating API shelves to developer portal (approve or reject the request) in digiRunner Admin Console. Therefore, the creation of these applications will be under review and based on the organization’s requirements.
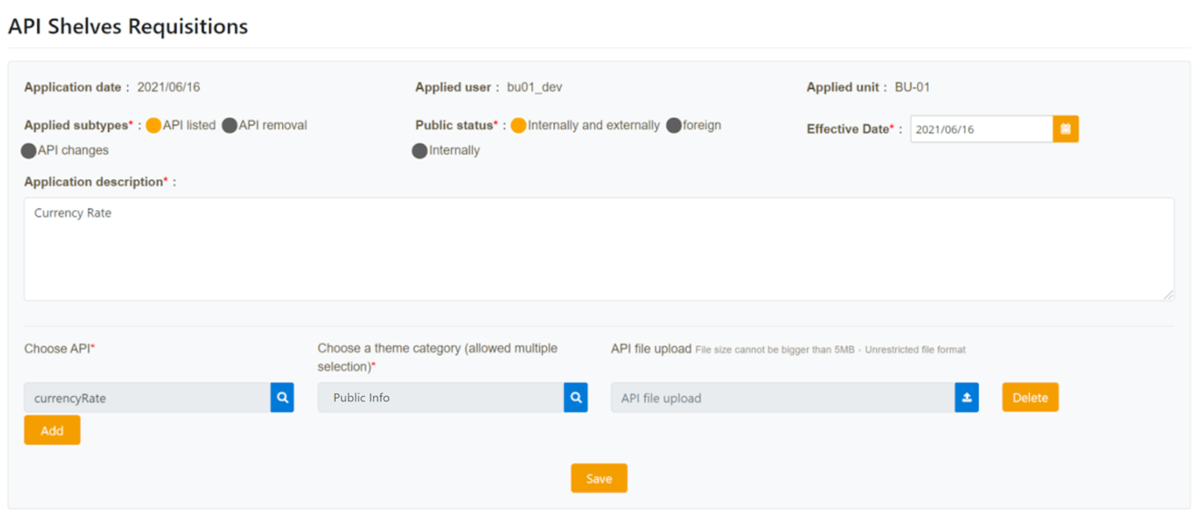
Click the “Application Form” of the left function module bar.
Go to “API Shelves Requisitions” and provide the required information, then click “Save” to save the requisition ticket.
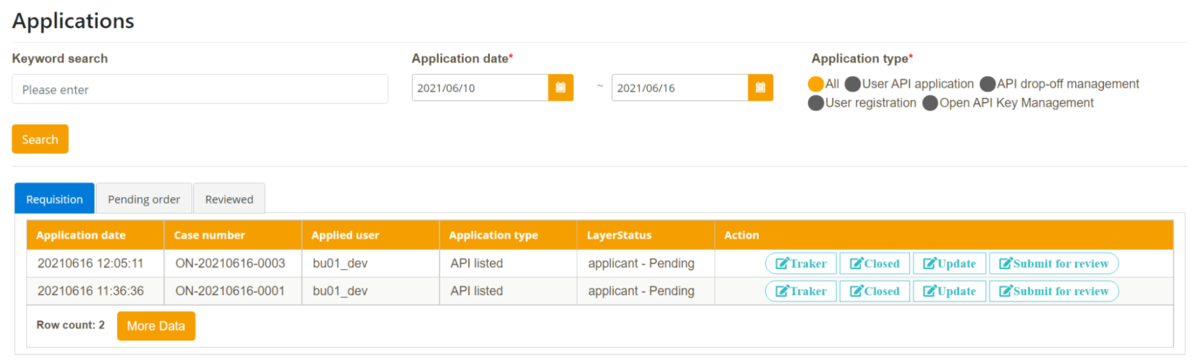
Go to “Application” under “Application Form” of the left function module bar.
Click “Submit for review” at the “Action” column for the approver’s review.
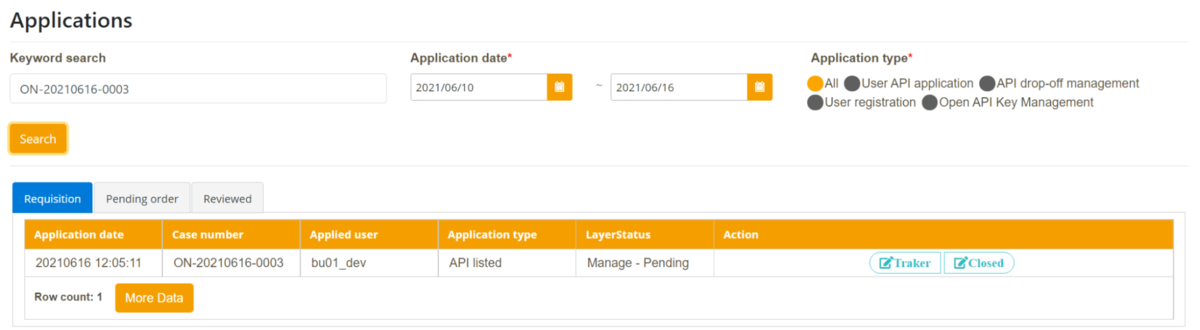
After submitting for review, you can search the ticket to see the latest status at the same page. (Application Form > Applications)
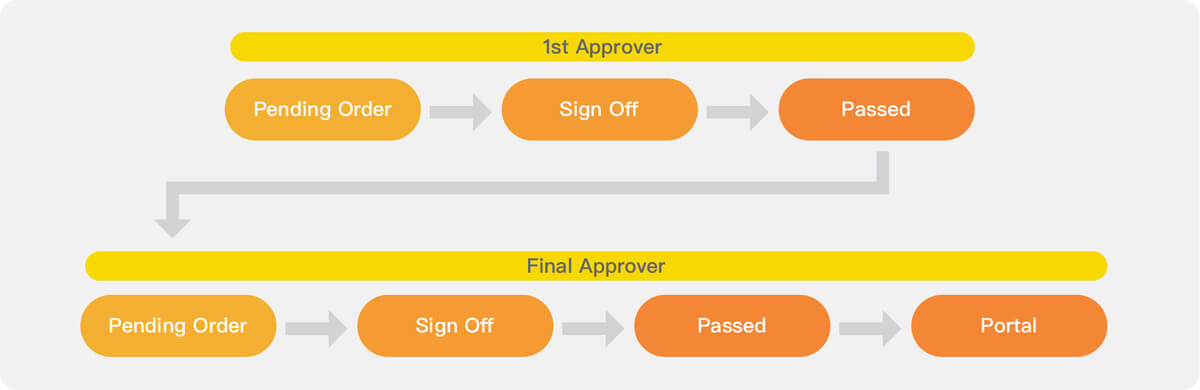
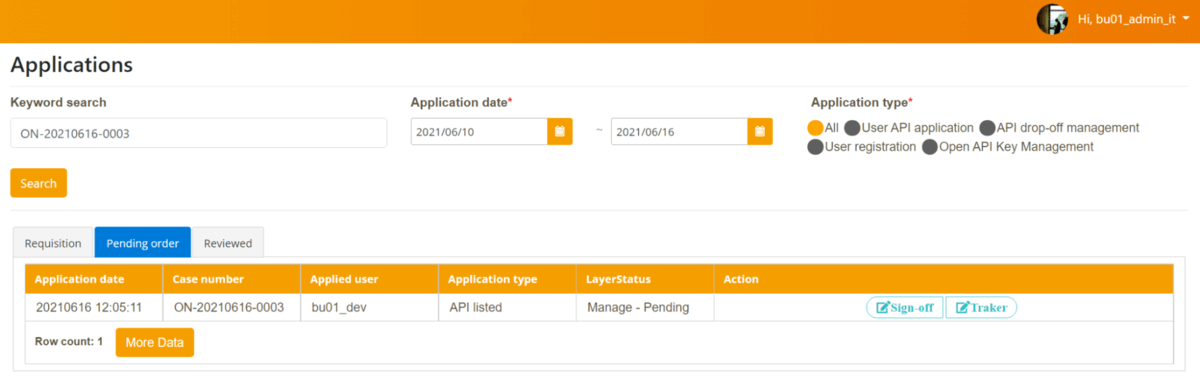
Approver can view a list of pending reviews at “Pending order” tab by clicking “Application” under “Application Form” of the left function module bar.
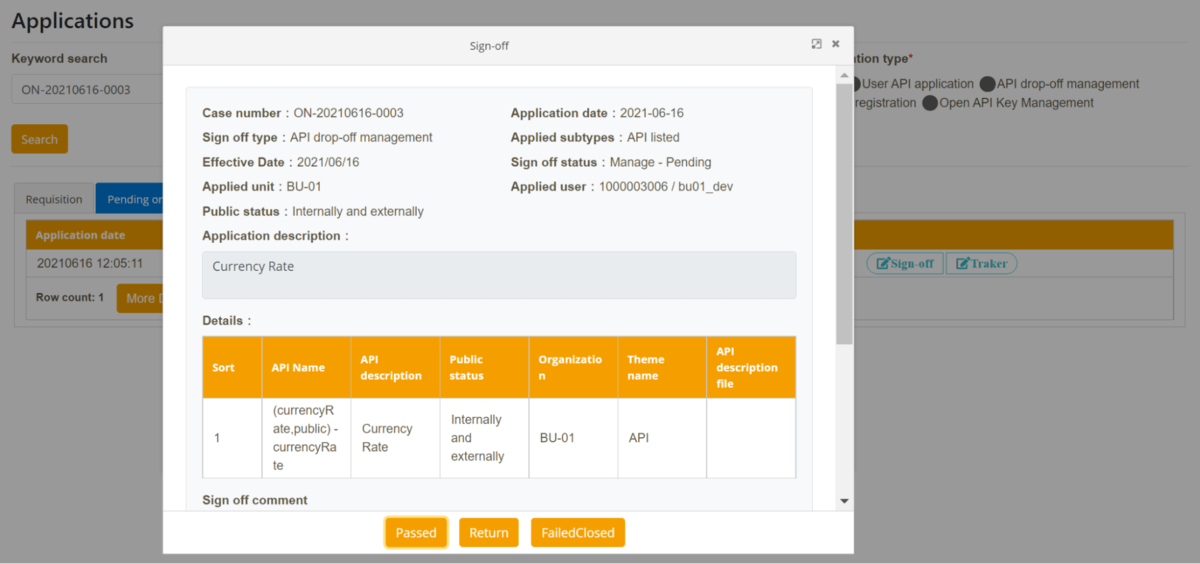
Click “Sign off” to see the request details and conduct the review actions.
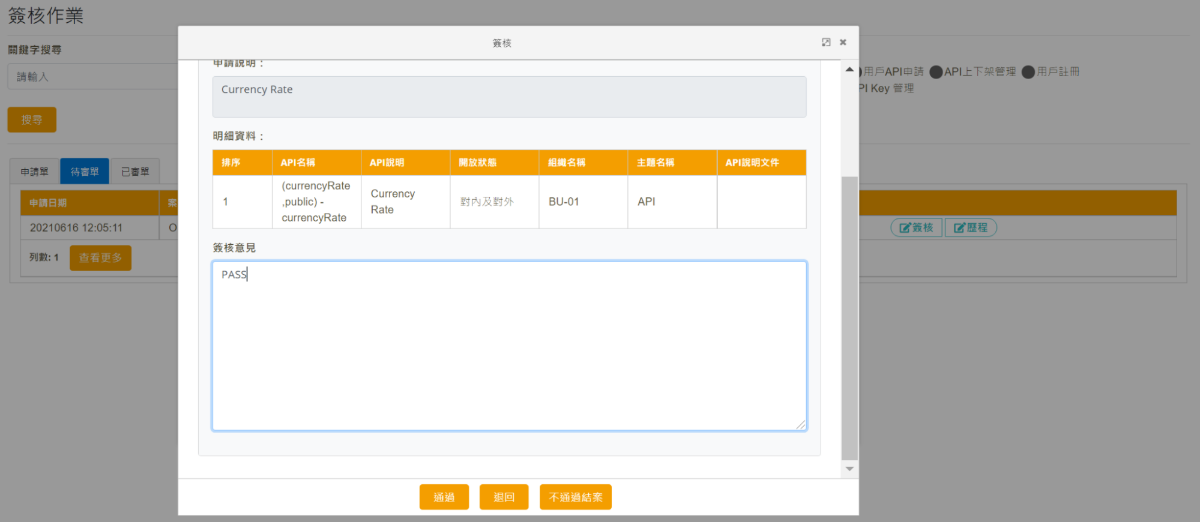
Provide sign off comments and click Passed.
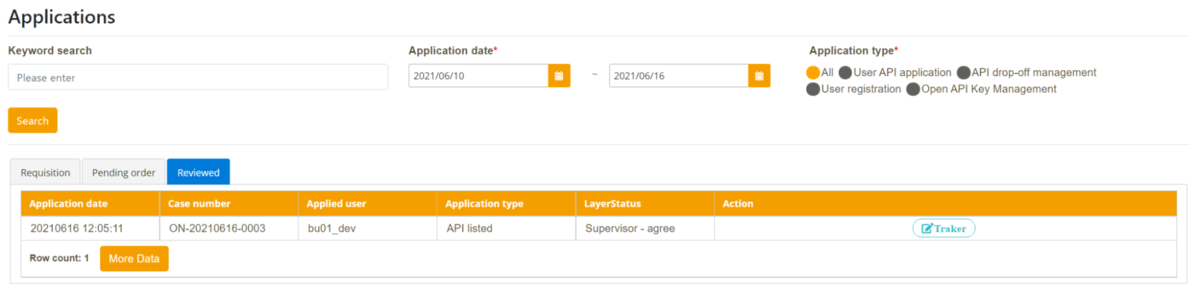
Approver can check the reviewed ticket at “Reviewed” tab, and search the ticket tracking history by clicking “Tracker” at the “Action” column.
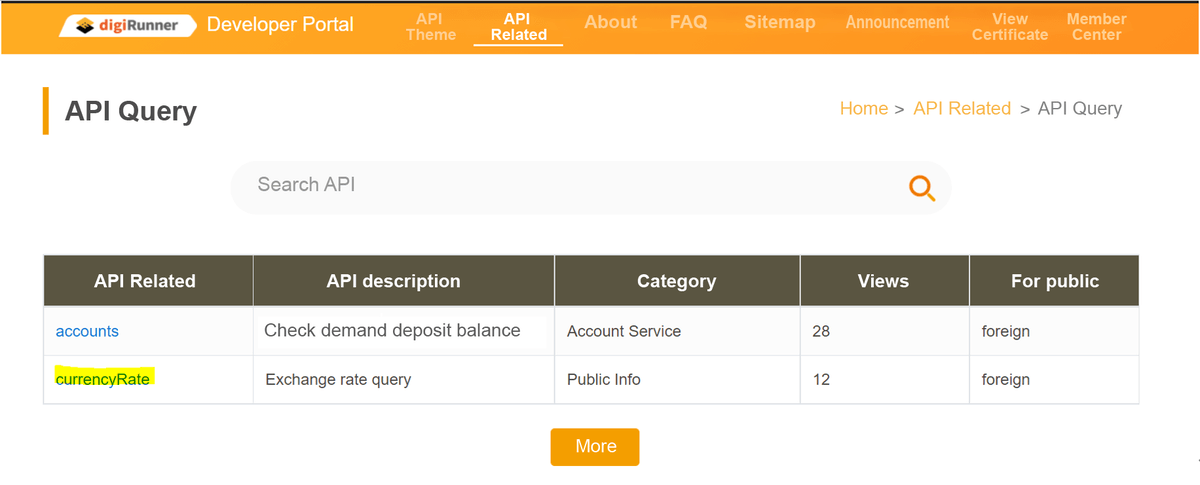
After all approved, the API can be searched on the Developer Portal and accessed by external clients.
(Available at digiRunner Enterprise)
In this scenario you will learn how to manage API Developer Portal or make an announcement on Developer Portal through digiRunner Admin Console.
You can manage the following features of API Developer Portal through the Admin console:
API Theme, FAQ, About Us, SiteMap, Announcement, and Swagger Settings.
Anny updated a new API Theme – Account Service and made the announcement to API Developer Portal users of the latest update. To finish the process, Anny simply managed it through Admin Console.
Click the “Web Portal Manager” of the left function module bar.
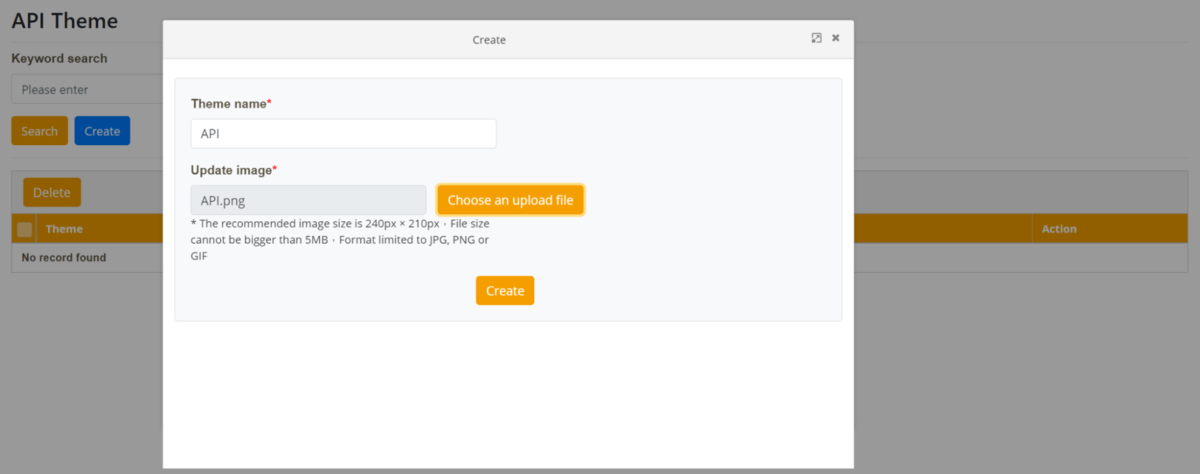
Go to “API Theme” to create a new theme and provide the theme image.
Click the “Web Portal Manager” of the left function module bar.
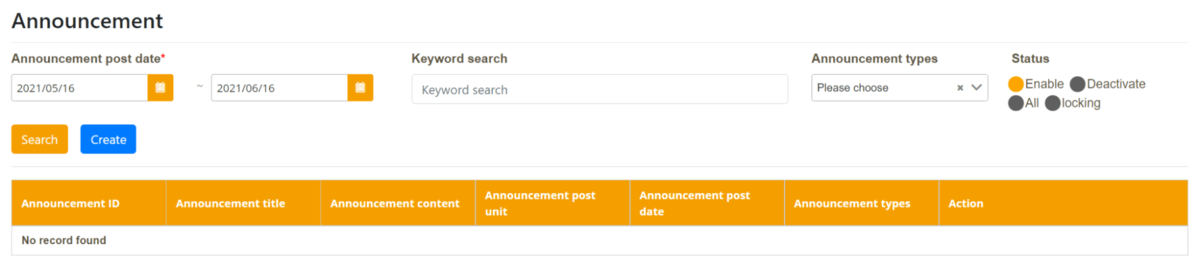
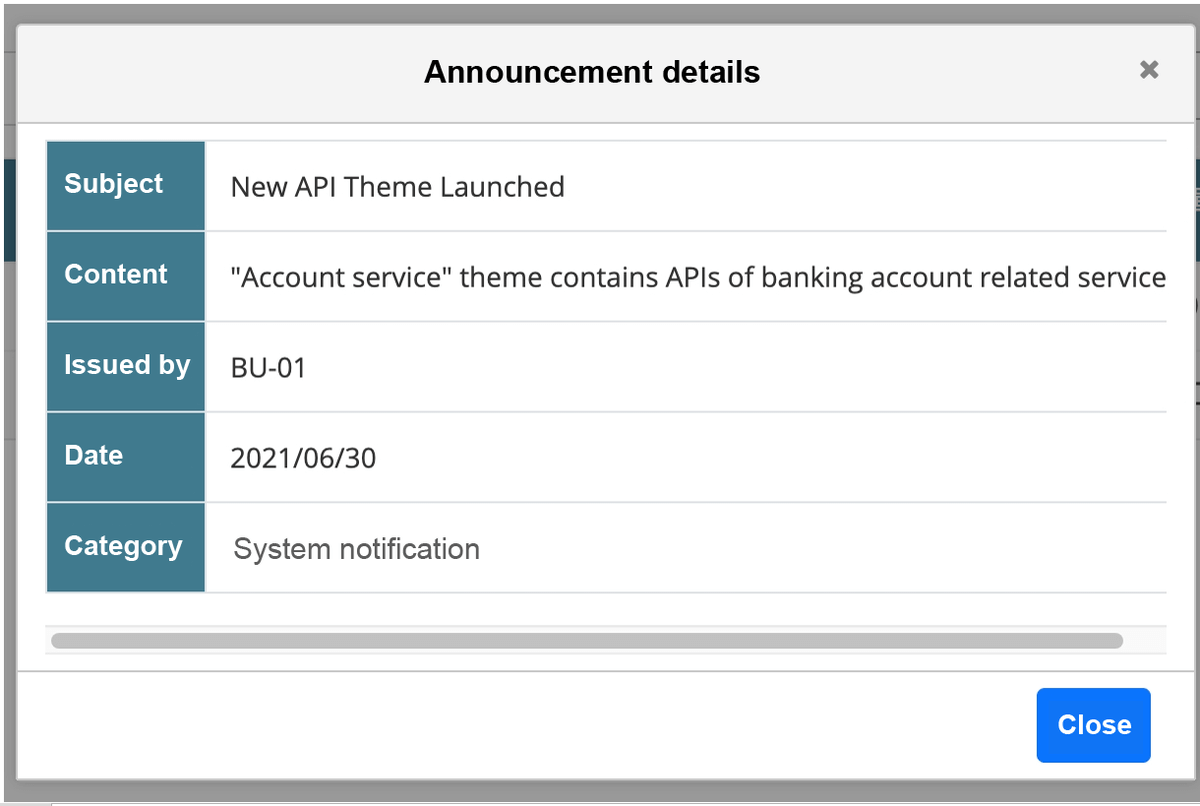
Go to “Announcement” to create a new announcement of the new API theme launched.
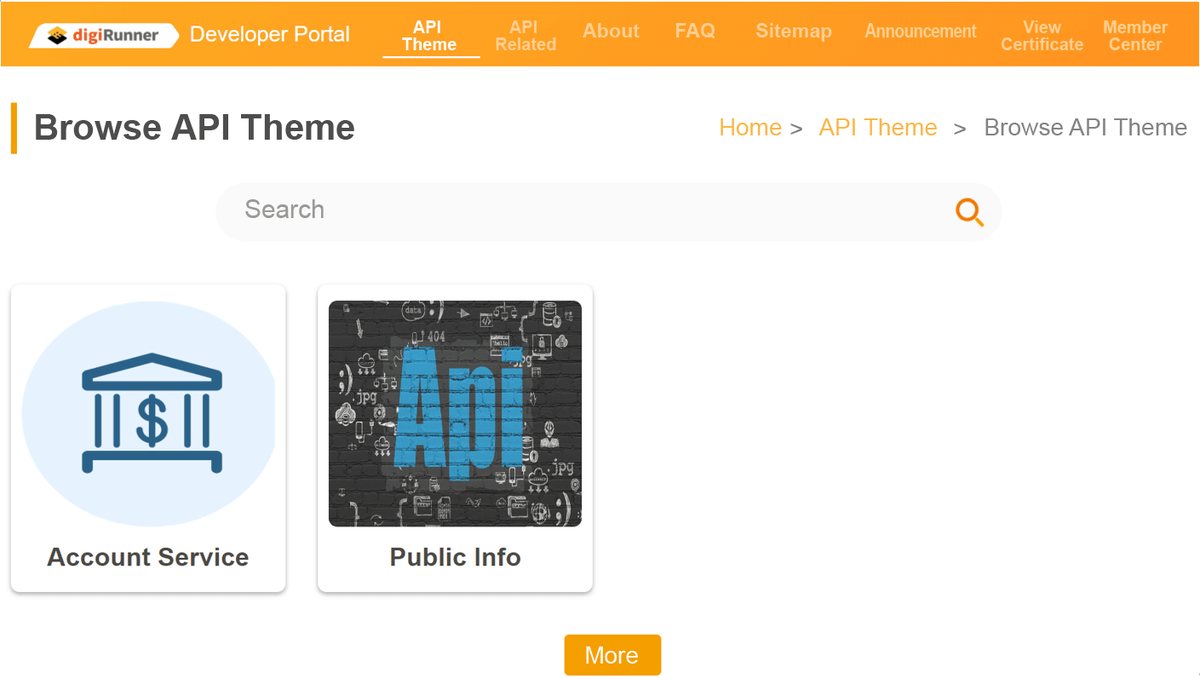
All the settings on Admin Console have been successfully updated to Developer Portal.
API Theme – Account Service
Announcement – New API Theme Launched